Loyalty Platform — Administrator Manual
The full reference for running a restaurant's loyalty program: every admin-panel screen, every setting, and how the cashier and guest experiences connect back to it.
01 Introduction
What this document covers, and who it's for.
This is the complete reference manual for the loyalty platform — every screen in the admin panel, what each setting does, and how it affects what your cashiers and guests see. If you're setting the program up for the first time, configuring campaigns, or just need to look up what a field does, this is the document to search.
There are three roles in the system, each with its own login and its own URL. As the owner or manager, you'll mostly live in the admin panel, but it helps to know how the other two work too.
| Role | How they sign in | URL pattern |
|---|---|---|
| Owner / admin | Email + password | https://loyalty.solvit.work/login |
| Cashier / staff | A 4–8 digit PIN, set by the admin in Settings — no email or password | https://loyalty.solvit.work/staff/{restaurant-slug} |
| Guest | No login at all — a personal link/QR code, or self-registration | /card/{guestId} or /join/{restaurant-slug} |
Section 13 covers chains — how the platform connects more than one of your locations together, if you run more than one. Sections 14–17 summarize staff management and the cashier and guest experiences for context. The cashier flow is also documented on its own, as a short till-side cheat sheet, for staff who don't need the full manual.
02 Plans & licensing
DEMO, BASIC, PRO, ENTERPRISE — what each unlocks.
Your restaurant's account runs on one of four plans. Plans are assigned by the platform, not self-serve — you can't upgrade yourself from inside the app; you request a change and get contacted.
| Plan | Guests | Programs | Push & automation | Notes |
|---|---|---|---|---|
| DEMO | No cap | All 4 types | Included | Full feature trial, time-limited |
| BASIC | Capped count | Only 1 program — any one of the 4 types (discount, cashback %, fixed cashback, or a stamp card) | No push notifications | Also limited to a single tier; no referrers; no fiscal-receipt scanning or the analytics built on it (see below) |
| PRO | Higher / no cap | All 4 types, multiple at once | Push notifications, segments & campaigns | Referrers and receipt scanning included |
| ENTERPRISE | Everything in Pro | All 4 types | Push, segments & campaigns | Plus multi-location management for restaurant groups |
On BASIC, screens for extra programs, tiers, segments, campaigns, and push notifications show upsell prompts instead of the full feature. This manual is written and screenshotted against an Enterprise-tier demo account, so every screen described here is unlocked — your own account may show fewer options depending on its plan.
A second, separate flag controls fiscal-receipt scanning specifically — a restaurant can be on PRO or above and still have this off if the platform team hasn't switched it on yet, though in practice every Pro+ account ships with it enabled. It's worth knowing exactly what this one flag turns on, because it cascades into several sections of this manual:
| Gated by receipt scanning (Pro+ only) | Stays available on BASIC |
|---|---|
| The till's 🧾 Scan receipt button and the whole receipt-QR flow behind it (see The cashier module) | The till's ordinary manual-amount keypad |
| The till's proactive personal-recommendation and paired-item hint on the charge/redeem screen | The dish-specific stamp condition — satisfied by manually checking a dish off a list at the till, no scanning involved (see Loyalty programs) |
| Analytics — ABC analysis, visit-time charts, guest preferences | The Menu catalog itself — manual entry and Excel import work on every plan; only its "add from receipts" shortcut is naturally empty without scanned data |
| Item pairings | Dangerous operations (fraud alerts) — unrelated to scanning, available everywhere |
| The Dashboard's Top purchases widget |
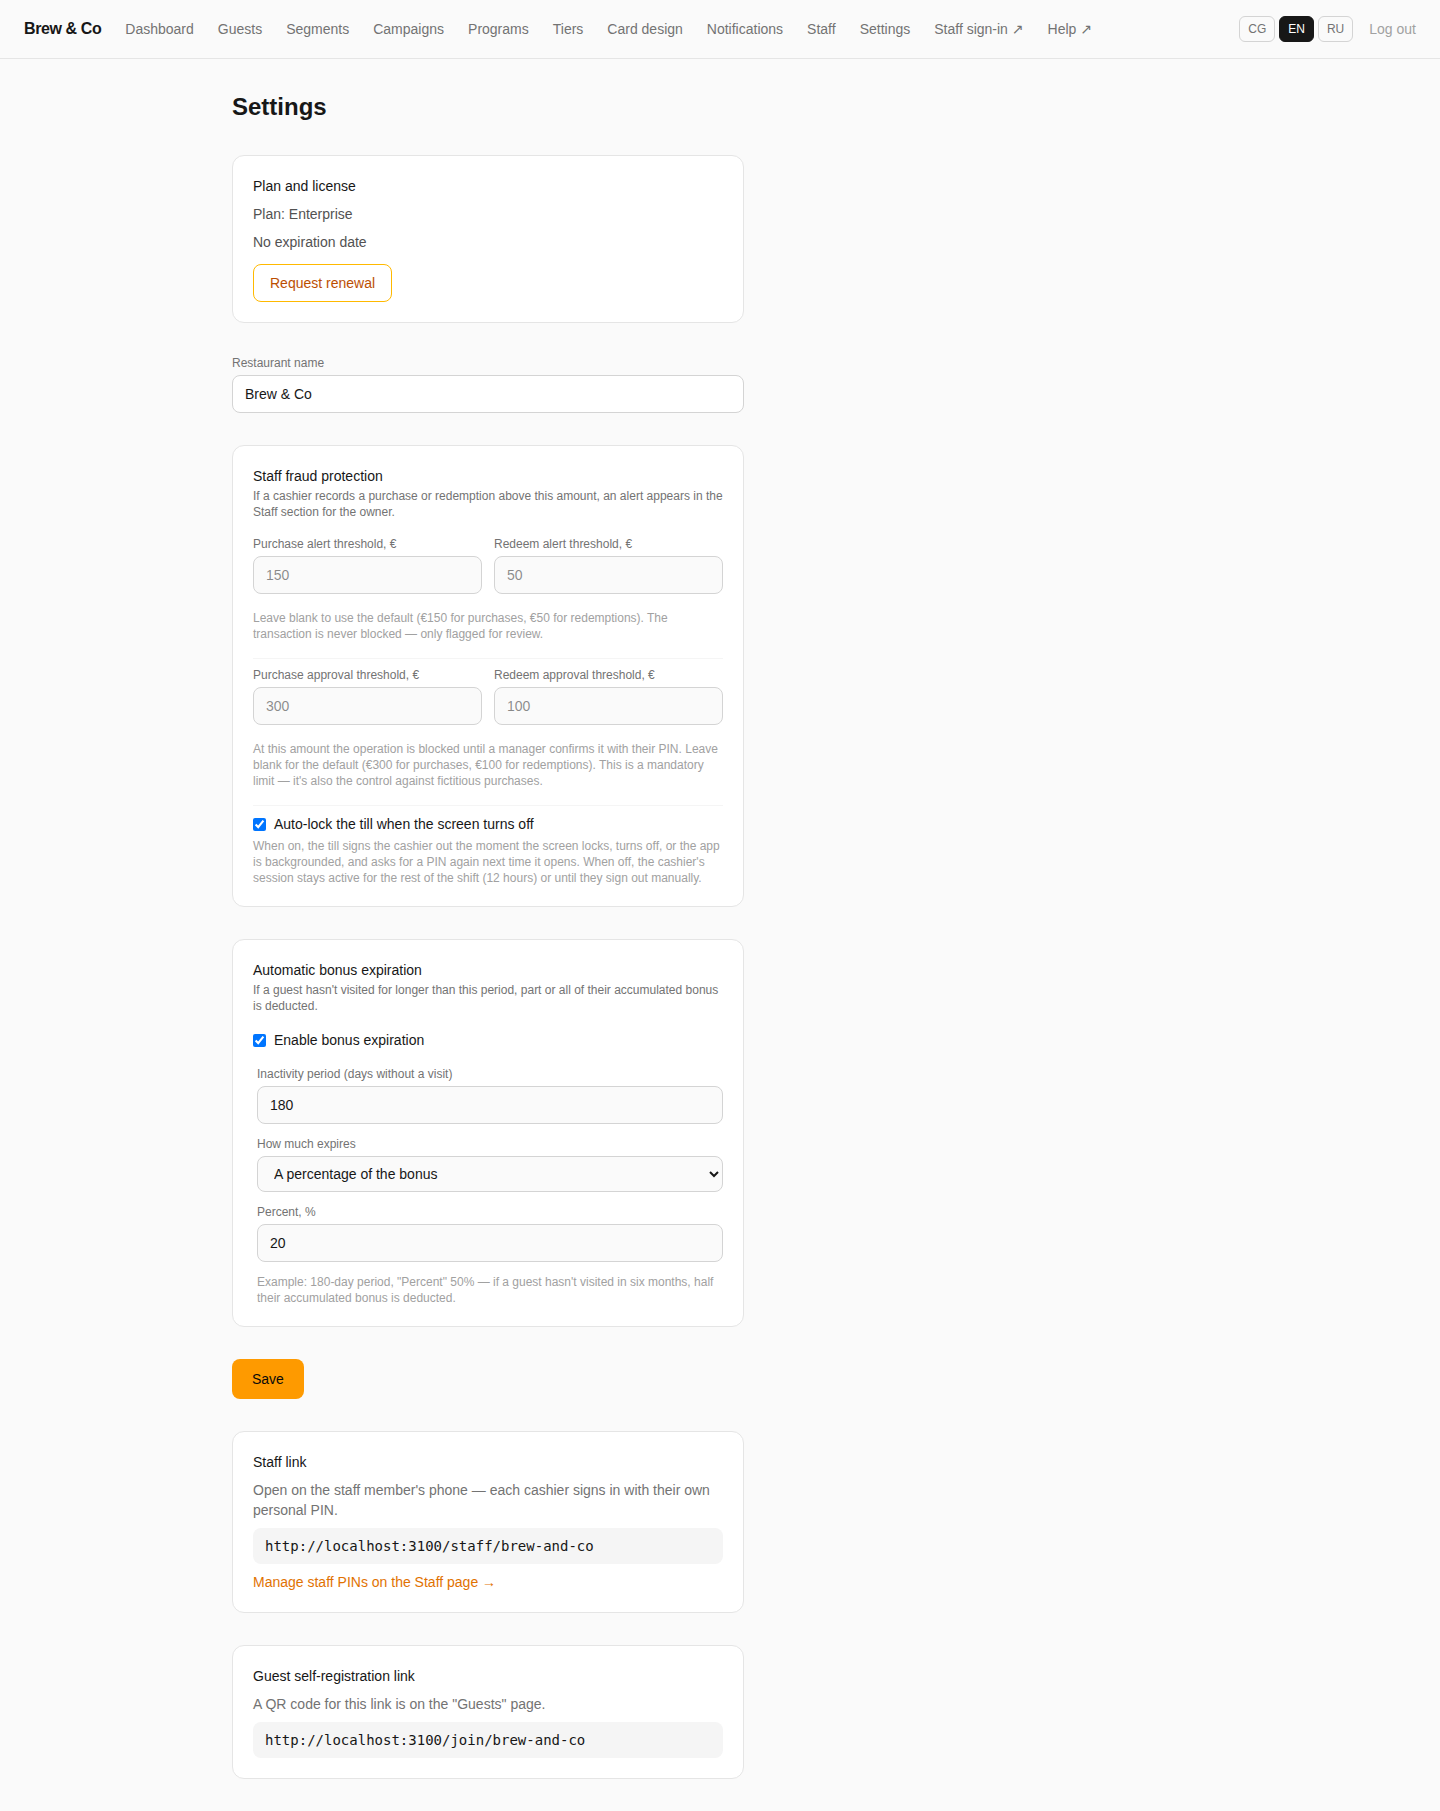
To request a plan change or renewal, go to Settings. The Plan and license box at the top shows your current plan and expiration (or No expiration date, as on the Enterprise demo account) with a Request renewal button — clicking it starts the conversation with the platform team, it doesn't change anything instantly.
03 Logging into the admin panel
Email + password, one login per restaurant.
- Open the login URL
Go to
https://loyalty.solvit.work/loginin a desktop or mobile browser. - Enter your email and password
These are the owner/admin credentials set up when your restaurant's account was created.
- You land on the Dashboard
From there, the top navigation bar — Dashboard, Guests, Segments, Campaigns, Programs, Tiers, Card design, Notifications, Settings — takes you anywhere else in the panel, plus a Staff sign-in link and a Log out link on the right.
The language switcher (RU / EN / CG) sits in the top-right corner of every admin page and changes the panel's own labels. It does not translate program, tier, or segment names you typed yourself — see A note on multilingual guests.
04 Dashboard
Your at-a-glance view of program health.
The Dashboard is the landing page after login. At the top, a line under the page title lists every currently active program by name, so you always know what's live at a glance.
| Metric | What it means |
|---|---|
| Total guests | Every guest who has ever registered, self-registered or added by staff. |
| Cashback issued, € | Total cashback ever credited to guests across all cashback programs, lifetime. |
| Cashback redeemed, € | Total cashback guests have actually spent against a bill, lifetime. |
| Outstanding, € | Issued minus redeemed — the cashback liability currently sitting on guest balances, unspent. |
| Total transactions | Every purchase and redemption ever recorded, combined. |
Below the metric cards, the Last 14 days chart is a daily bar chart with three series — Spent (€), Earned (€), and Redeemed (€) — so you can see purchase volume and program activity move together day by day.
The Guest sources bar shows the split between guests Added by staff (cashier manually created a card) and Self-registered (guest filled in the join form themselves). If any self-registered guests came through one of your referrers' personal links (Referrers section in the menu), a third segment, Via referrer link, breaks that number out separately. Next to it, the Guest segments box shows a colored bar plus a list of how many guests sit in each RFM segment (Champion/Loyal/Drifting/At risk/New — see Segments); clicking any segment in that list opens Guests pre-filtered to it.
Below that, the Guest tiers box works the same way but for tiers — including any tier with zero guests in it, shown as "0" rather than being hidden, so you can see a tier exists even if nobody has reached it yet. Clicking a tier opens the same pre-filtered Guests view.
The Top spenders table lists the eight guests with the highest lifetime spend — name, visit count, and total spent, with each name linking to that guest's detail page. Next to it, Birthdays has a 7/30/90-day toggle and lists which guests have a birthday coming up in that window, with the date and days remaining — handy for a manual glance even with the automatic Birthday campaign already enabled.
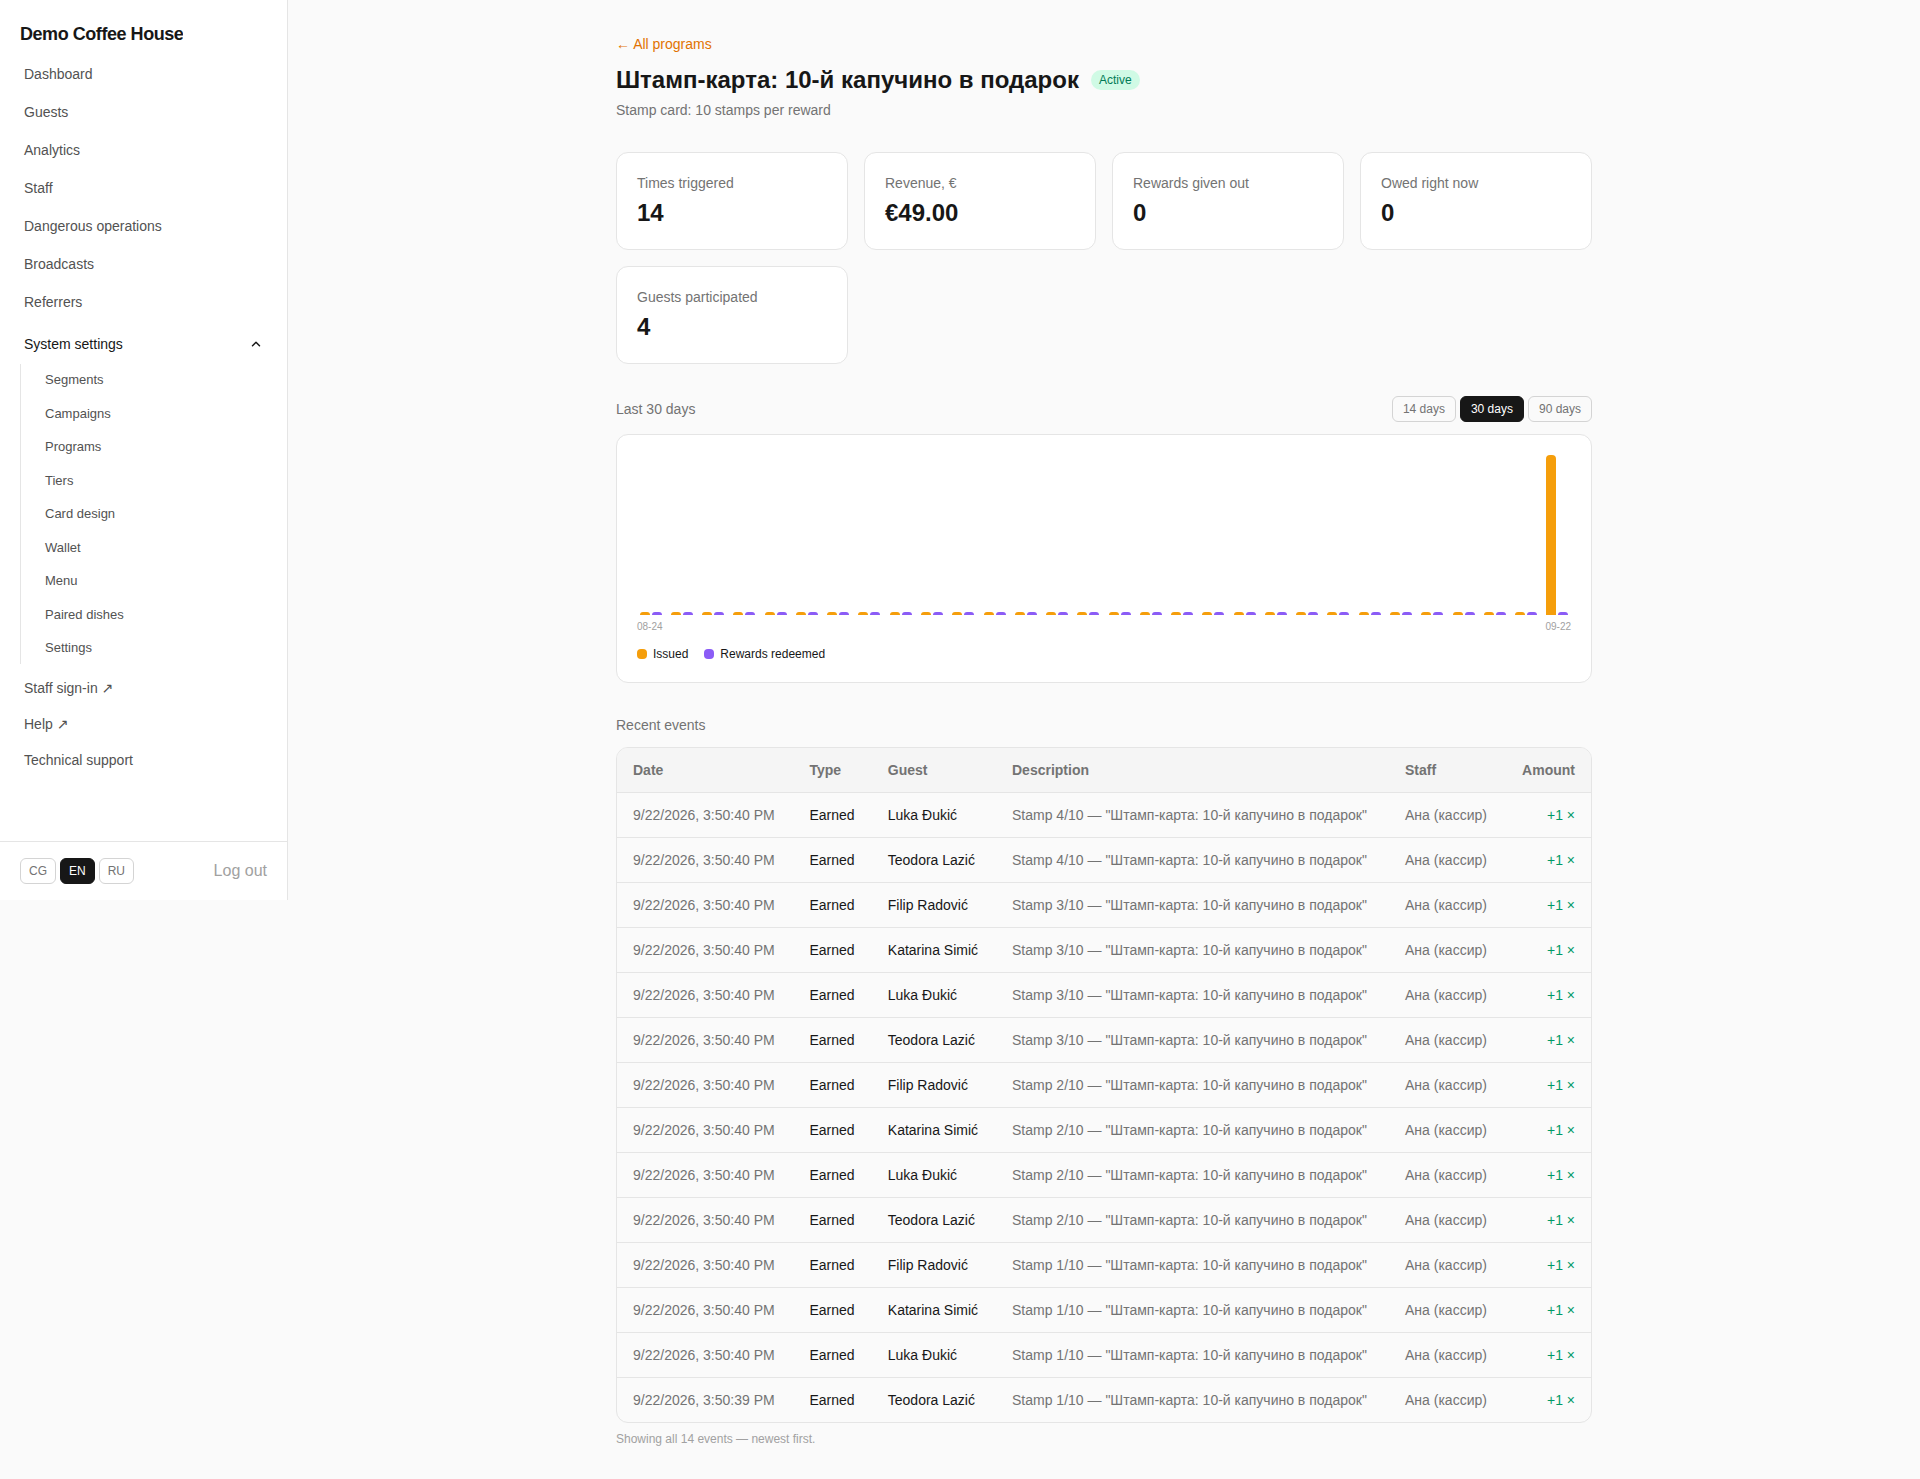
Program performance lists every program with its Status, how many times it has Triggered, and how much it has Issued — in € for cashback and discount programs — the fastest way to see which program is actually doing work and which one is sitting idle. For a stamp card, Issued shows owner-meaningful numbers instead of raw stamps: how many rewards (free coffees, mugs, etc.) have already been given to guests, and — when any are currently banked but not yet claimed — how many you'd still owe if every guest came to redeem today. Every program's name in this table is a link — clicking it opens its full statistics: daily activity, a list of guests with a reward ready (for stamp cards), and a complete event log so any number here can be checked by hand (see Loyalty programs for a worked example of that drilldown).
Two more widgets appear when the relevant feature is in use. If you've set up any referrers, a Top referrers table lists each one by name with their guest count, revenue, and average check — the same per-referrer numbers as the Referrers page itself. If receipt scanning is available on your plan, a Top purchases table lists dishes by how often they've been ordered, guest count, and revenue, with a See full analytics → link through to the full Analytics section.
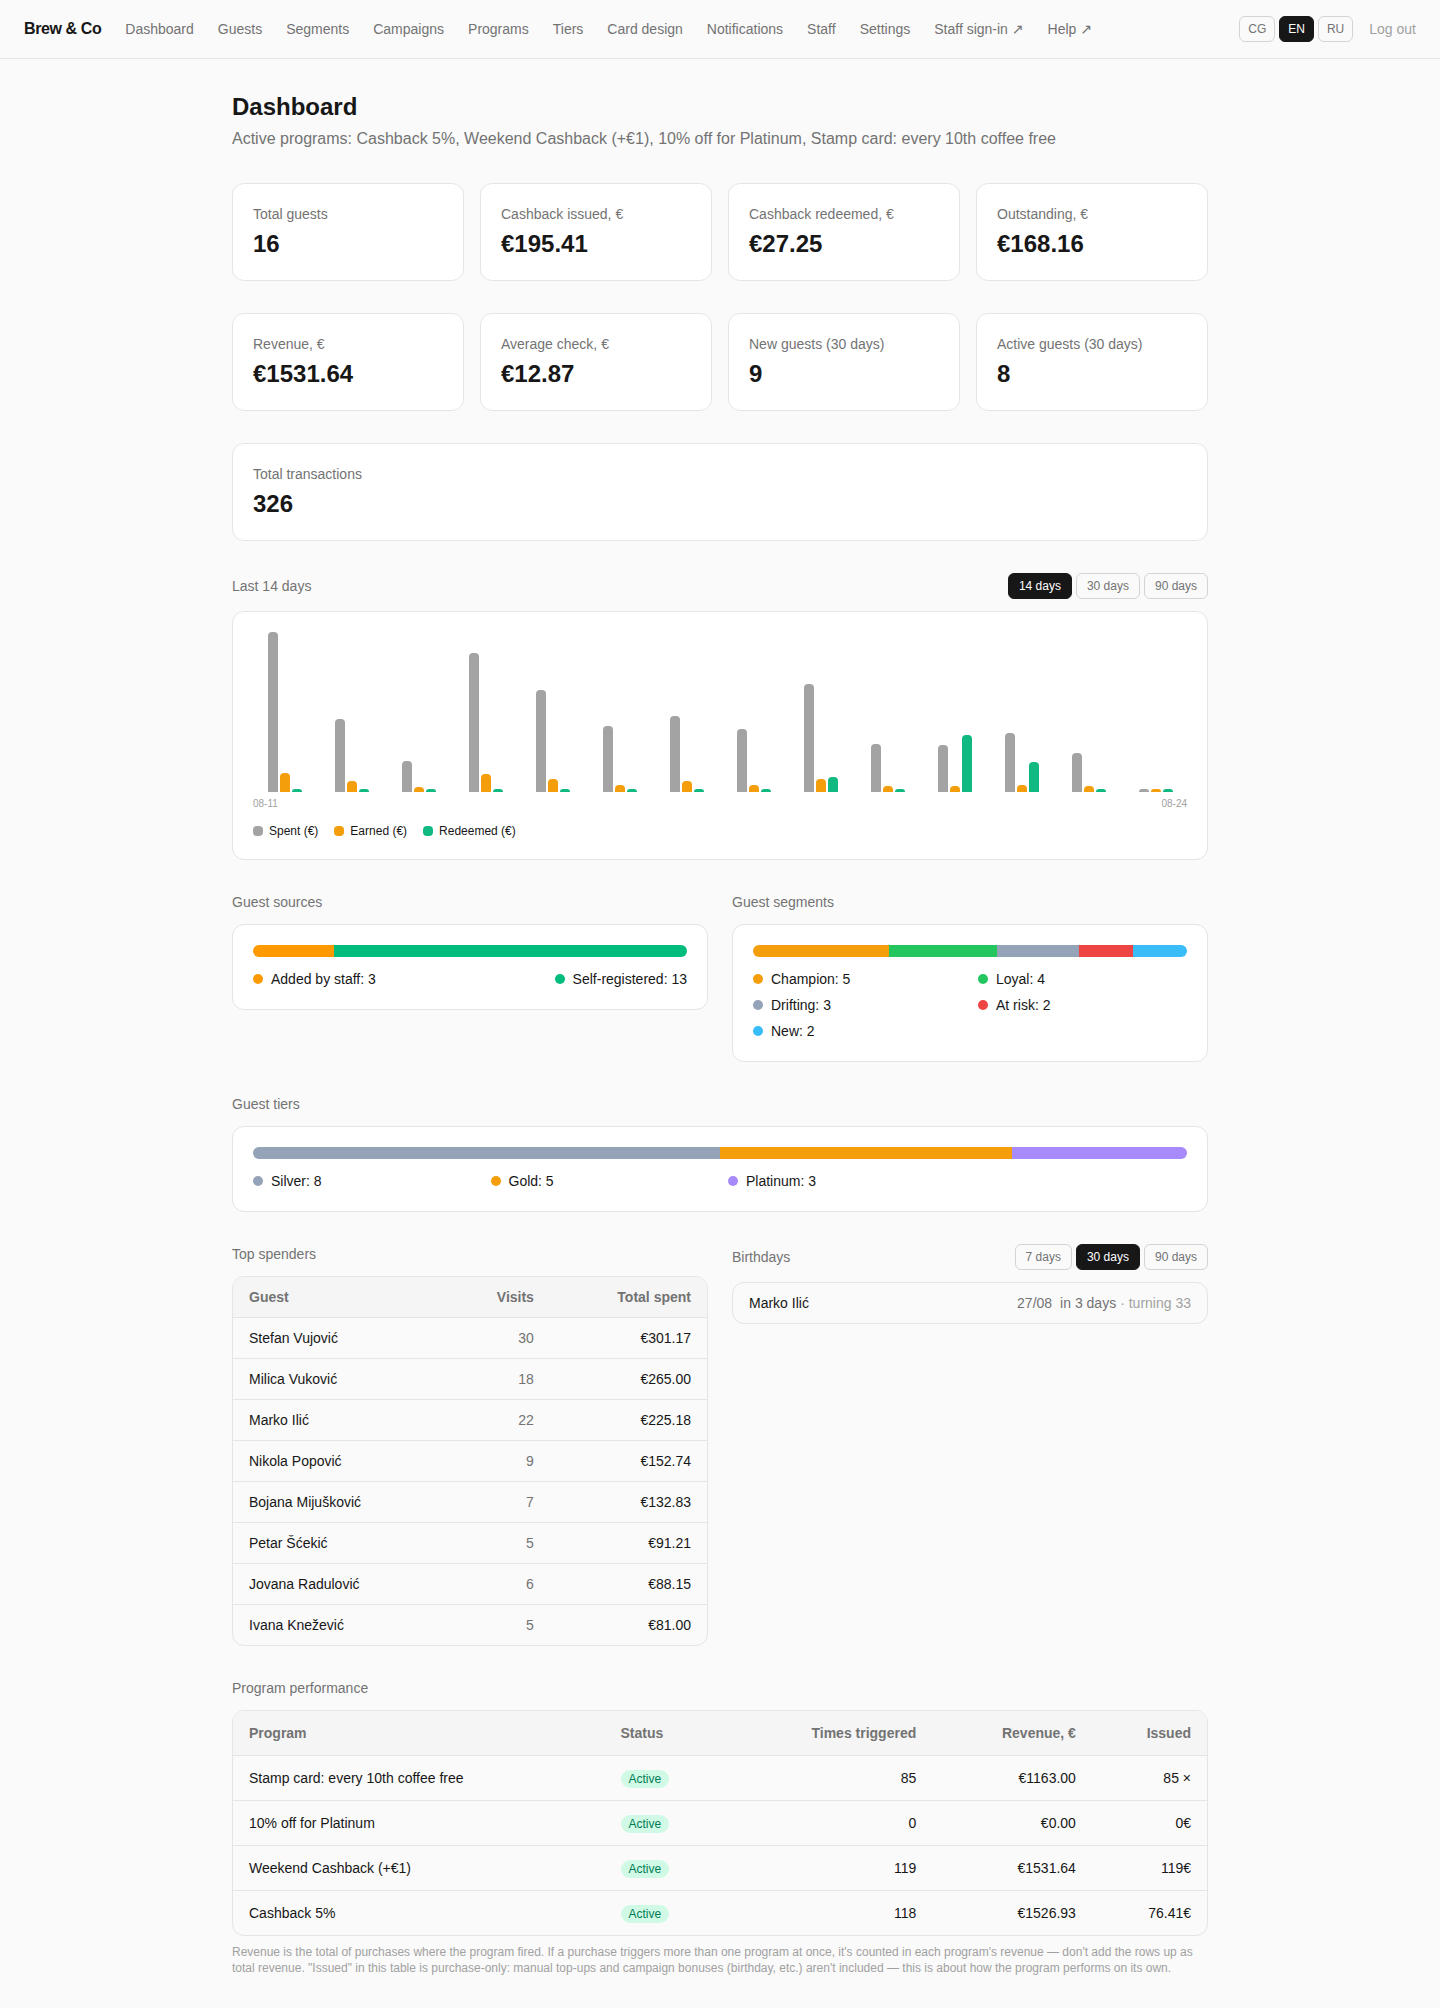
Program, segment, and tier names throughout the dashboard are whatever the restaurant owner typed when creating them — this demo account happens to have named everything in English ("Cashback 5%", "Stamp card: every 10th coffee free"), but the platform never translates free text like this on its own. See the note on multilingual guests.
05 Guests
Your full guest list, filters, and each guest's detail page.
The Guests page lists every guest with a Filters panel above the table: Segment (defaults to "All guests"), Gender, Tier, Not visited for, days, Avg. check from/to, €, Total spent from, €, and Visits from, with Apply and Reset buttons. The table itself is sortable by any column: Name, Card, Phone, Balance, Tier, Segment, Total spent, Visits, Avg. check, Last visit.
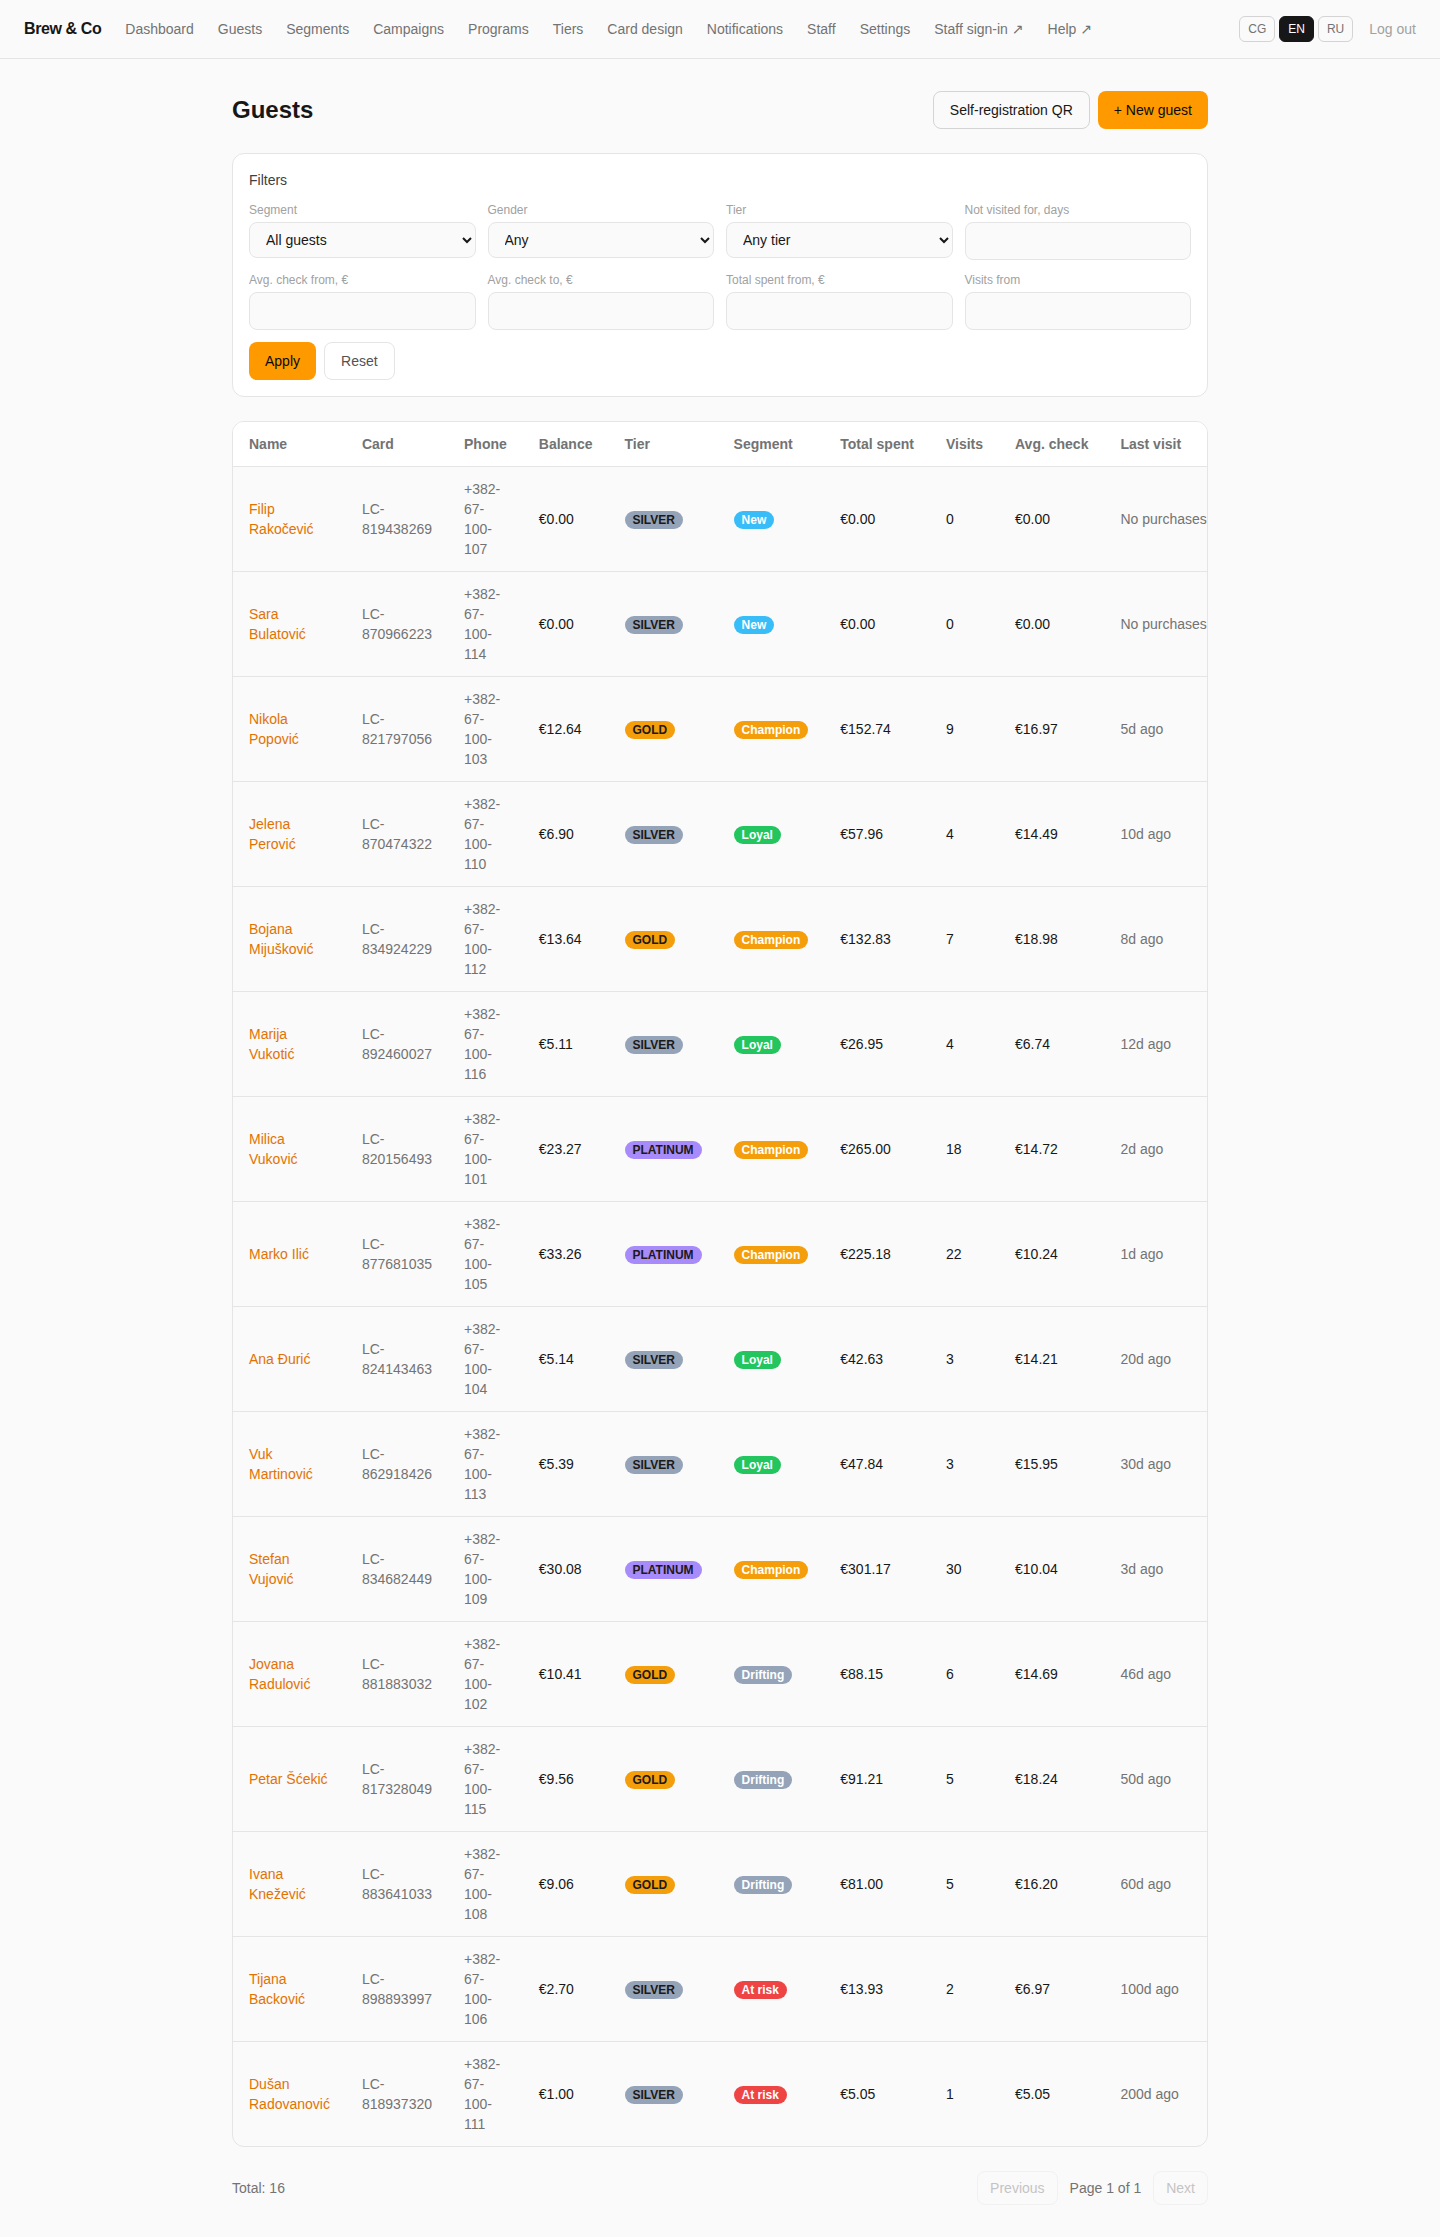
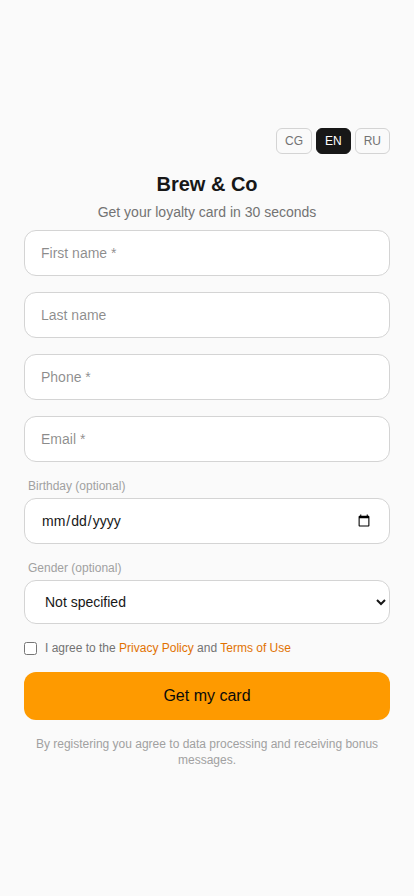
Two buttons sit above the table: Self-registration QR opens the printable QR code that sends guests to your join form (the same form as the Guest self-registration link in Settings), and + New guest lets staff or admin create a card manually for a guest standing in front of them.
Clicking any guest's name opens their detail page: a balance card for every cashback program they hold, a tier badge next to their name with an Edit link to override it manually and a Tier history link next to that (see Tiers), a Statistics box (Total spent, Total earned, Total redeemed, Visits, First visit, Last visit), their personal Guest card (QR) with an Open guest page → link, and a full transaction history table (Date, Type, Description, Amount) — identical in substance to what the guest sees on their own card.
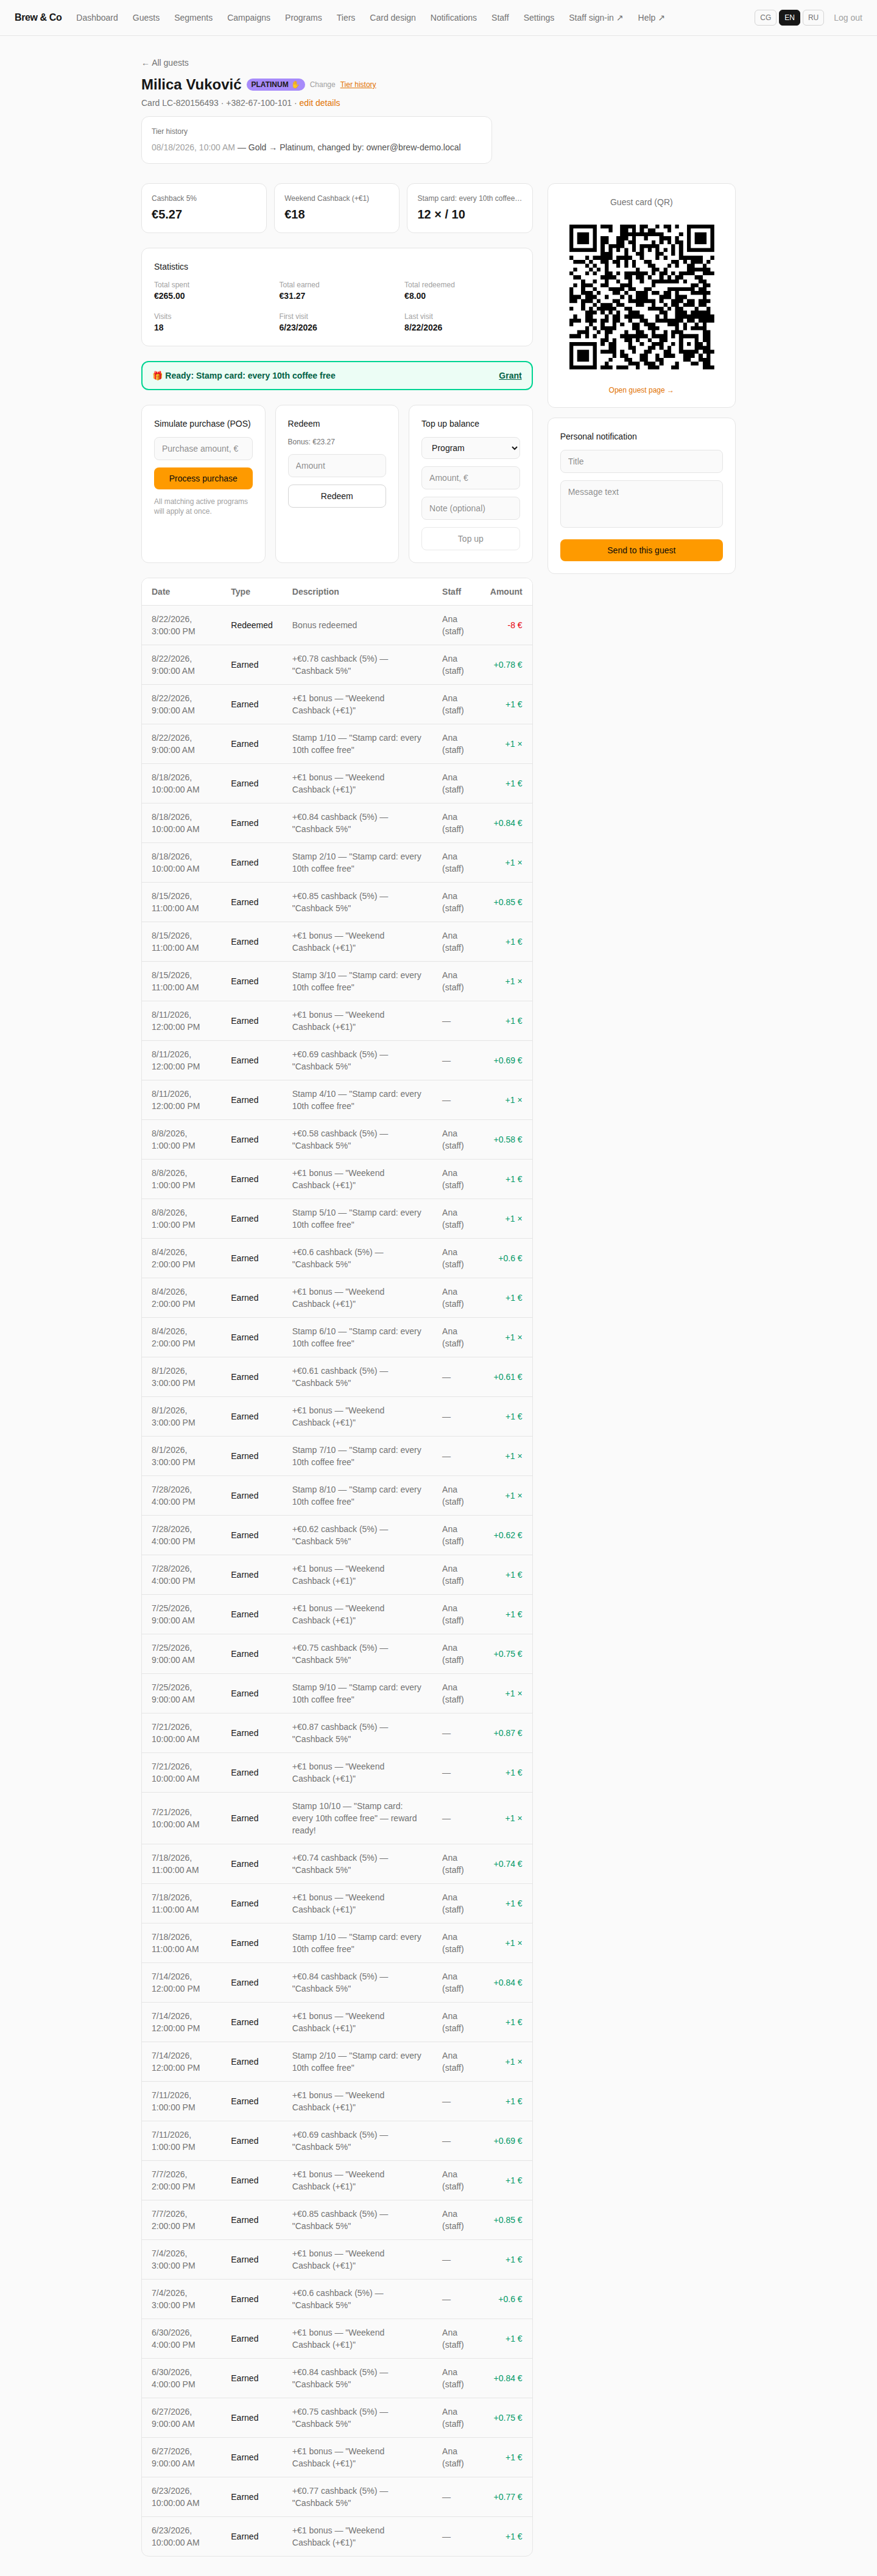
If a stamp reward is ready, a green banner reading e.g. 🎁 Ready: Stamp card: every 10th coffee free appears with a Grant link — same as on the till.
Two boxes let you act on the guest without a physical till at all:
- Simulate purchase (POS)
Enter a Purchase amount, € and tap Process purchase. All matching active programs apply at once, exactly as they would at the cashier's till — useful for correcting a missed purchase or testing a new program's conditions.
- Redeem
Shows the guest's combined Bonus: €X.XX. Enter an Amount and tap Redeem to deduct it — the same combined-balance behavior as the till (see Loyalty programs).
These simulator boxes exist on the admin guest detail page too, not just at the till — handy for back-office corrections or demoing the program without touching a shift device.
The Personal notification box sends a push to this one guest only: fill in Title and Message text, then tap Send to this guest. It only reaches them if they've opted in and installed the card page — see Push notifications.
06 Segments
Automatic RFM buckets, plus your own custom groups.
Every guest is placed automatically into one recency/frequency ("RFM") segment, recalculated live with no manual work. The Segments page lists the five built-in segments first, each tagged built-in, followed by any custom ones you've created.
| Segment | Rule |
|---|---|
| New | No purchase yet |
| Champion | Visited in the last 14 days and has 5+ lifetime visits |
| Loyal | Visited in the last 45 days |
| Drifting | 45–90 days since last visit |
| At risk | 90+ days since last visit |
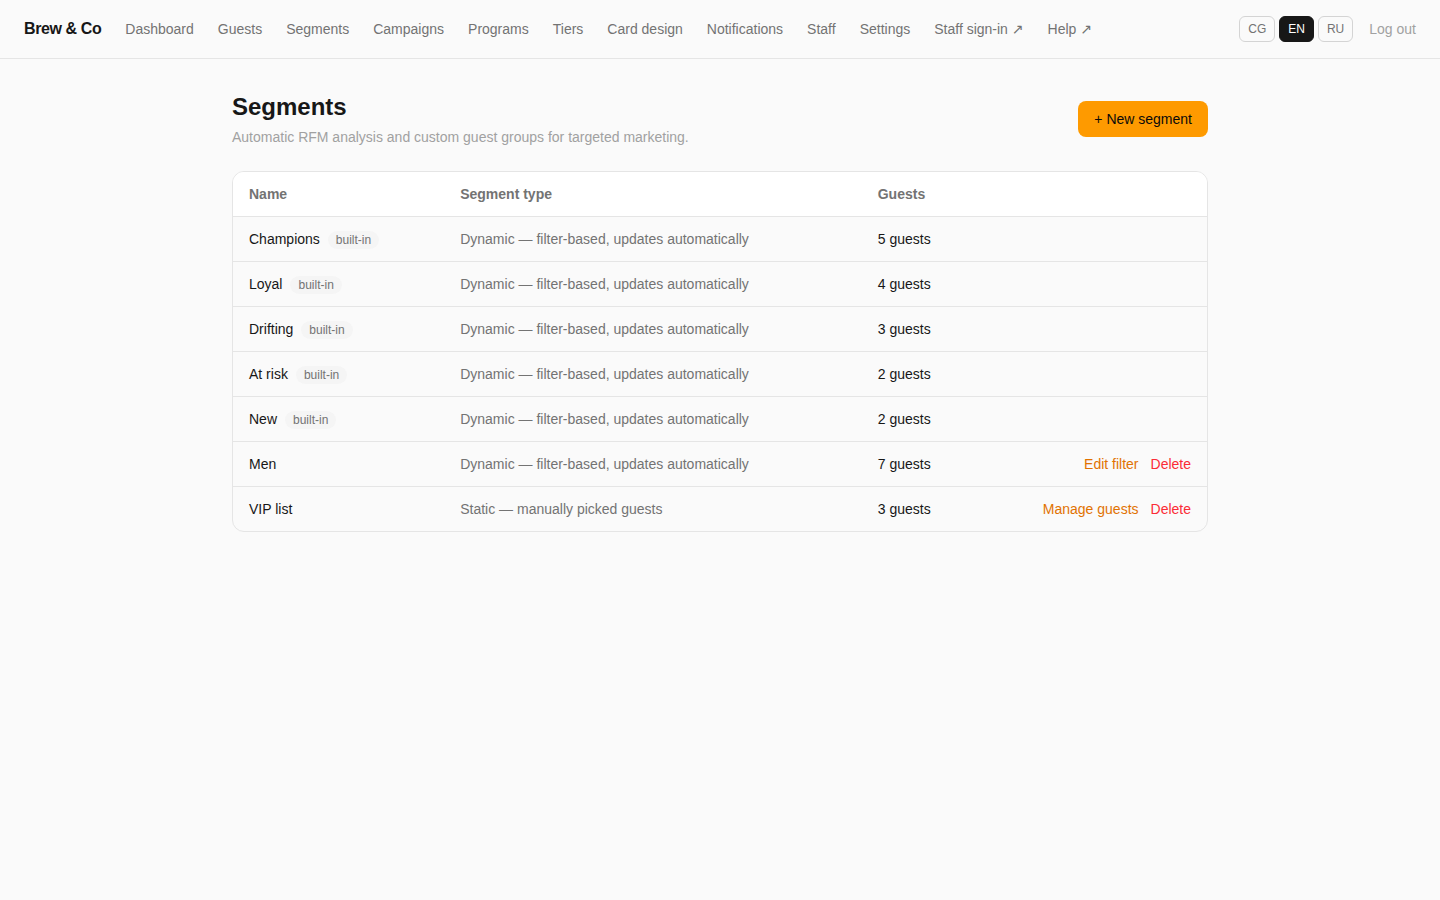
Each row shows its Segment type and current guest count. Built-in segments are always Dynamic — filter-based, updates automatically. Tap + New segment to build your own, in one of two ways:
- Dynamic (filter-based)
Define a rule — e.g. gender, a spend threshold — and the segment membership recalculates automatically as guests' stats change. Editable later via Edit filter.
- Static (manually picked)
A hand-picked, fixed guest list — e.g. a "VIP list" — that only changes when you add or remove someone yourself via Manage guests.
Even the built-in segments' display names are editable free text, just like program and tier names — this demo account happens to have them in English ("Champions", "Loyal", "Drifting", "At risk", "New"), but the platform doesn't translate them for you if you rename them into another language. See the closing note.
Every guest-list filter described in Guests — gender, average check, total spend, visit count — doubles as a way to scope a custom segment.
07 Campaigns
Three automatic scenarios that run daily, unattended, once configured.
The Campaigns page holds three built-in automations, each with its own Enabled checkbox. Once turned on and saved, they run on their own, once a day, with no further admin action needed.
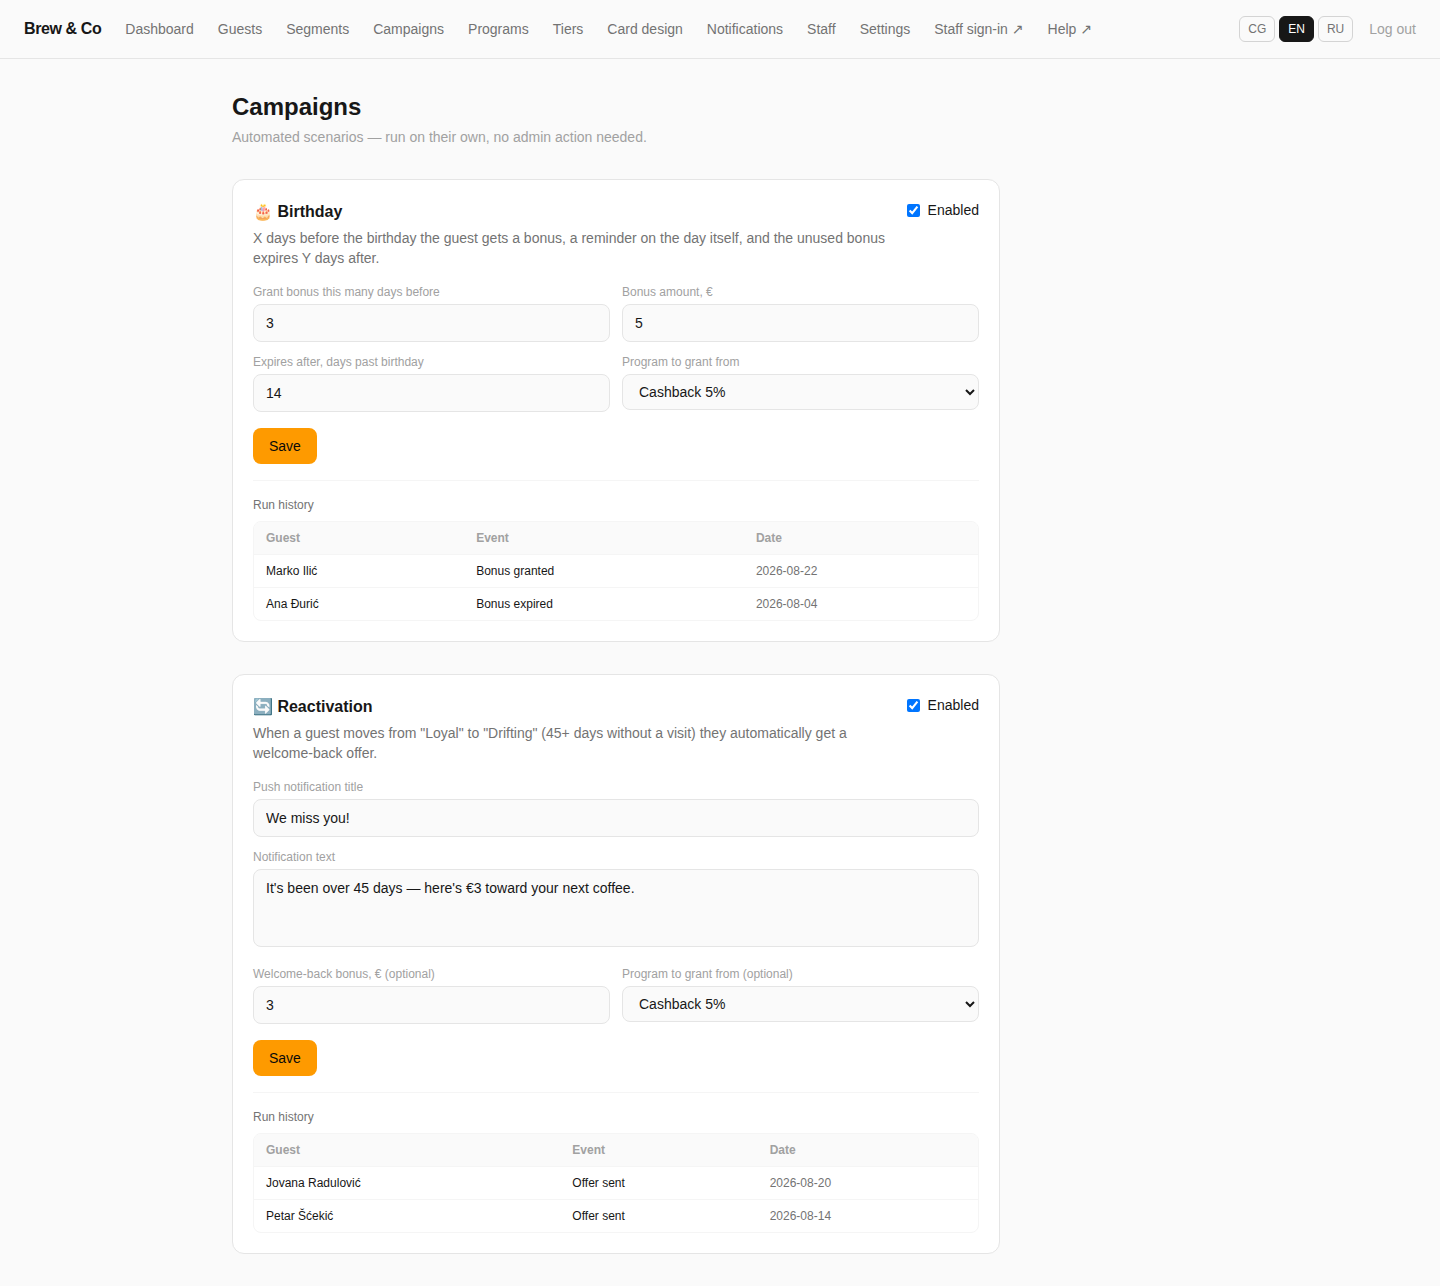
🎂 Birthday — grants a bonus ahead of a guest's birthday, then lets it expire if unused:
| Field | Demo value | Meaning |
|---|---|---|
| Grant bonus this many days before | 3 | How many days before the birthday the bonus is granted |
| Bonus amount, € | 5 | How much is credited |
| Expires after, days past birthday | 14 | If unused by then, the unused bonus is automatically removed |
| Program to grant from | Cashback 5% | Which cashback program's balance receives the bonus |
🔄 Reactivation — the instant a guest's segment crosses from Loyal into Drifting (that is, they pass 45 days without a visit), they automatically receive a push with a "come back" offer, no admin action required. Configure a Push notification title and Notification text, and optionally a Welcome-back bonus, € (optional) credited to a chosen Program to grant from (optional).
Both panels end with a Run history table (Guest, Event, Date) so you can confirm the automation is actually firing — e.g. "Milica Vuković — Bonus granted — 2026-07-12" or "Jovana Radulović — Offer sent — 2026-08-16".
Run history is the fastest way to sanity-check a new campaign: save your settings, then come back the next day and confirm the expected guests show up in the table before trusting it long-term.
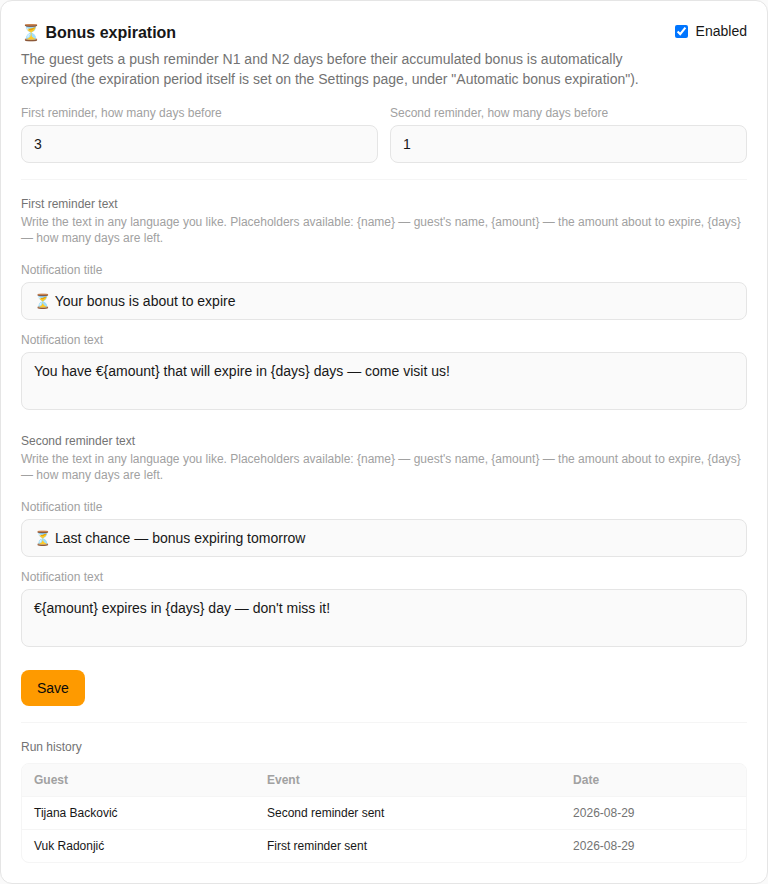
⏳ Bonus expiration — warns a guest ahead of time, before their accumulated bonus is automatically deducted for inactivity (the deduction itself is configured on the Settings page, under "Automatic bonus expiration"). Sends two separate push reminders: the first this many days before expiration, the second closer to it (defaults: 3 and 1 day). Each reminder has its own title and body, written by you in any language, with {name} (guest's name), {amount} (the amount that will actually expire — respecting the "Percent"/"Fixed amount" mode from Settings, not the whole balance), and {days} (how many days are left) available as placeholders.
The campaign itself never deducts or grants anything — it only reads the guest's balance and warns. The actual deduction still happens lazily, on the guest's next purchase or redemption, exactly per the rules in "Automatic bonus expiration". If that setting is still off, the panel shows a warning with a direct link to turn it on — otherwise the reminders would check in every day with nothing to warn about.
08 Loyalty programs
Four program types, each a "condition → action" rule.
The Loyalty programs page describes itself well: "Each program is a 'condition → action' rule. You can keep several active at once — e.g. 5% cashback + a separate stamp program + a weekend discount." Tap + New program to add one; existing rows offer Edit, Disable, and Delete.
| Type | What it does | Typical conditions |
|---|---|---|
| Cashback % | Guest earns a percentage of the purchase as spendable balance | Optional max cashback per purchase; optional minimum purchase amount |
| Cashback fixed | Guest earns a flat € amount per qualifying purchase, regardless of bill size | Same shared conditions below |
| Discount % | An automatic percentage off the bill, applied immediately — a smaller charge, not a balance | Can be restricted to specific guest tiers |
| Stamp card | One stamp per qualifying purchase; after N stamps the reward is ready for one-tap redemption | Same shared conditions below |
Any program type can also be limited by: minimum/maximum purchase amount, specific days of week, specific hours, first-purchase-only, guest's-birthday-only, or restricted to specific tiers.
A stamp card has one more condition available, on top of all of the above: Award stamp only for a specific dish ties stamp-earning to one item from your Menu catalog, instead of any qualifying purchase at all — for example, so "10th cappuccino free" only counts a purchase that actually includes a cappuccino, not just any coffee. The dish list for this condition is pulled straight from the Menu section, so set that up first if you want to use it. At the till, the cashier satisfies it by checking the matching dish off a small checklist shown above the keypad — nothing needs to be scanned, so this condition works on every plan, including BASIC, even though receipt scanning itself doesn't. When set, the programs table's Condition column shows it plainly, e.g. "dish only: Cappuccino."
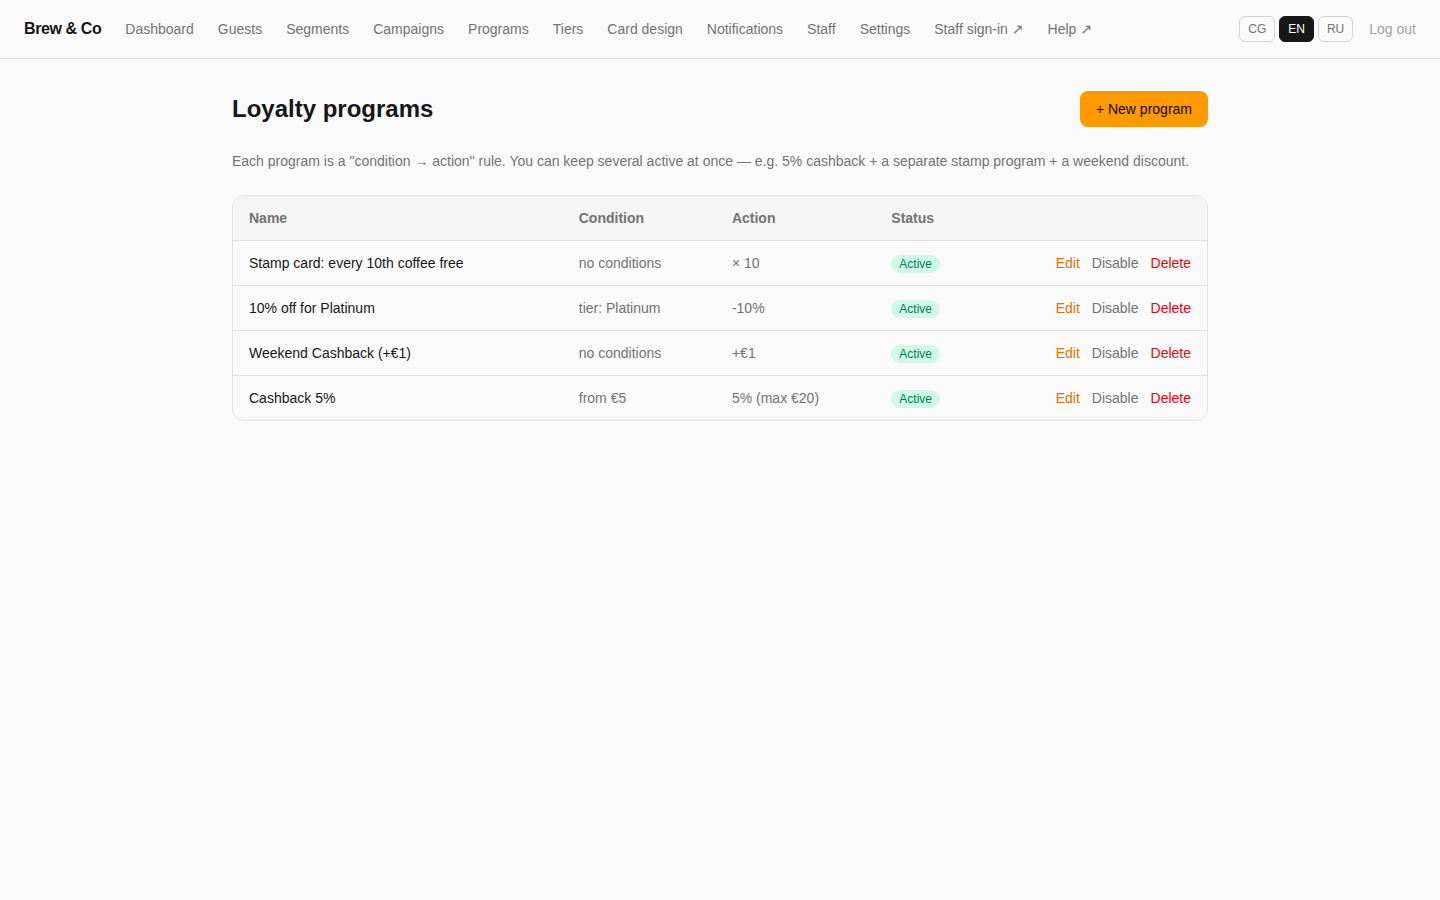
Clicking a program's name (in either the table above or the Dashboard's Program performance list) opens its own statistics page: how many times it has fired, total turnover it's driven, how many rewards it has actually granted, how many distinct guests have participated, a 30-day activity chart, and a full event log of individual awards by guest name — everything you'd need to check a summary number by hand.
A guest can hold balance in several cashback programs at once. The till (and the admin Redeem box) debit across them automatically, oldest balance first, and always show the guest one combined total to redeem — the cashier is never asked to pick which program to draw from.
09 Tiers
Automatic levels based on lifetime spend.
A guest's tier is determined automatically from their lifetime purchase total at your restaurant — you just set the € threshold each tier unlocks at. As the page itself puts it: "Any names work: Silver/Gold/Platinum, Bronze/Ruby, or your own."
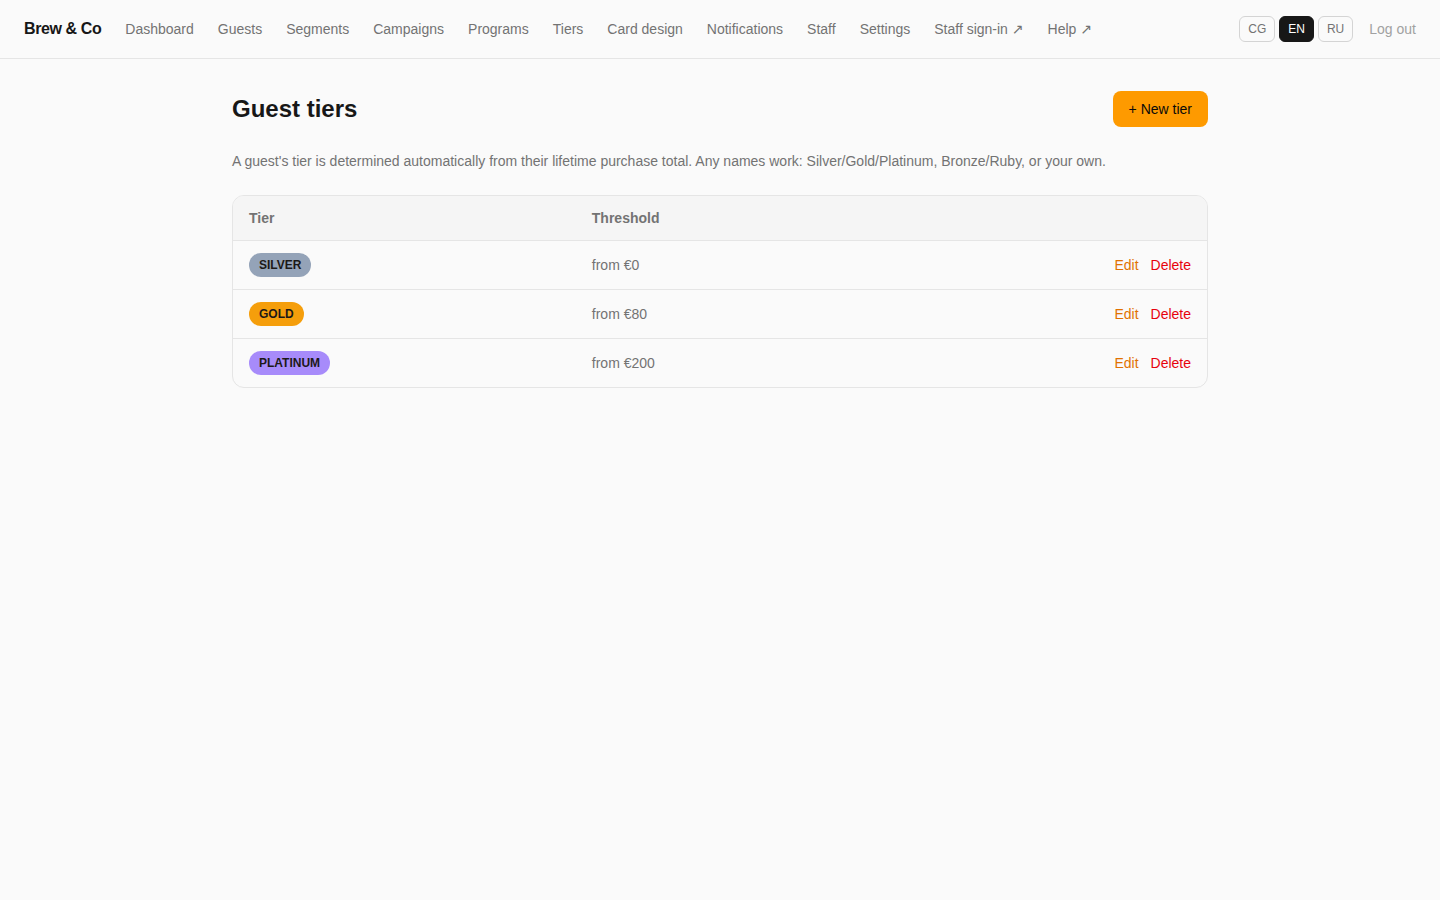
| Tier (demo) | Threshold |
|---|---|
| Silver | from €0 |
| Gold | from €80 |
| Platinum | from €200 |
Tiers show as a colored badge next to the guest's name everywhere — the admin guest list, the guest detail page, and the guest's own card. Their real power, though, is gating: a Discount % program can be restricted to a specific tier, e.g. this demo's "10% off for Platinum", which only applies once a guest has crossed the €200 lifetime-spend line into the top tier.
A tier can also be set manually, overriding the automatic threshold — via the Edit link next to a guest's tier badge on their detail page (see Guests). This is meant for VIP exceptions: a guest who hasn't technically spent their way to Platinum yet but deserves the status by relationship or agreement. A manual override is logged as its own entry in that guest's Tier history (date, direction of the change, and the admin email that made it) — a natural tier-up from ordinary spending is not logged there, since nobody made a decision, it's just the normal consequence of purchases.
If two tiers share the same entry threshold (e.g. both "from €0"), any guest without a manual override always shows the base tier, never a newer tier that happens to tie on threshold — the platform distinguishes "tier assigned by hand" from "tier computed from spend" even when the thresholds are tied.
On the BASIC plan, only one tier is available — tier-gated discounts aren't practically usable until you're on Pro or Enterprise.
10 Card design
One set of branding, three places it shows up.
The Loyalty card design page lets you set: Title on the card, Subtitle (e.g. program name), a Logo (an emoji, or an uploaded image via Upload image), a Card background image (uploaded, or a gradient built from Primary color / Secondary color / Text color if no image is set), with a live Preview (demo data) panel on the right showing exactly how it will render.
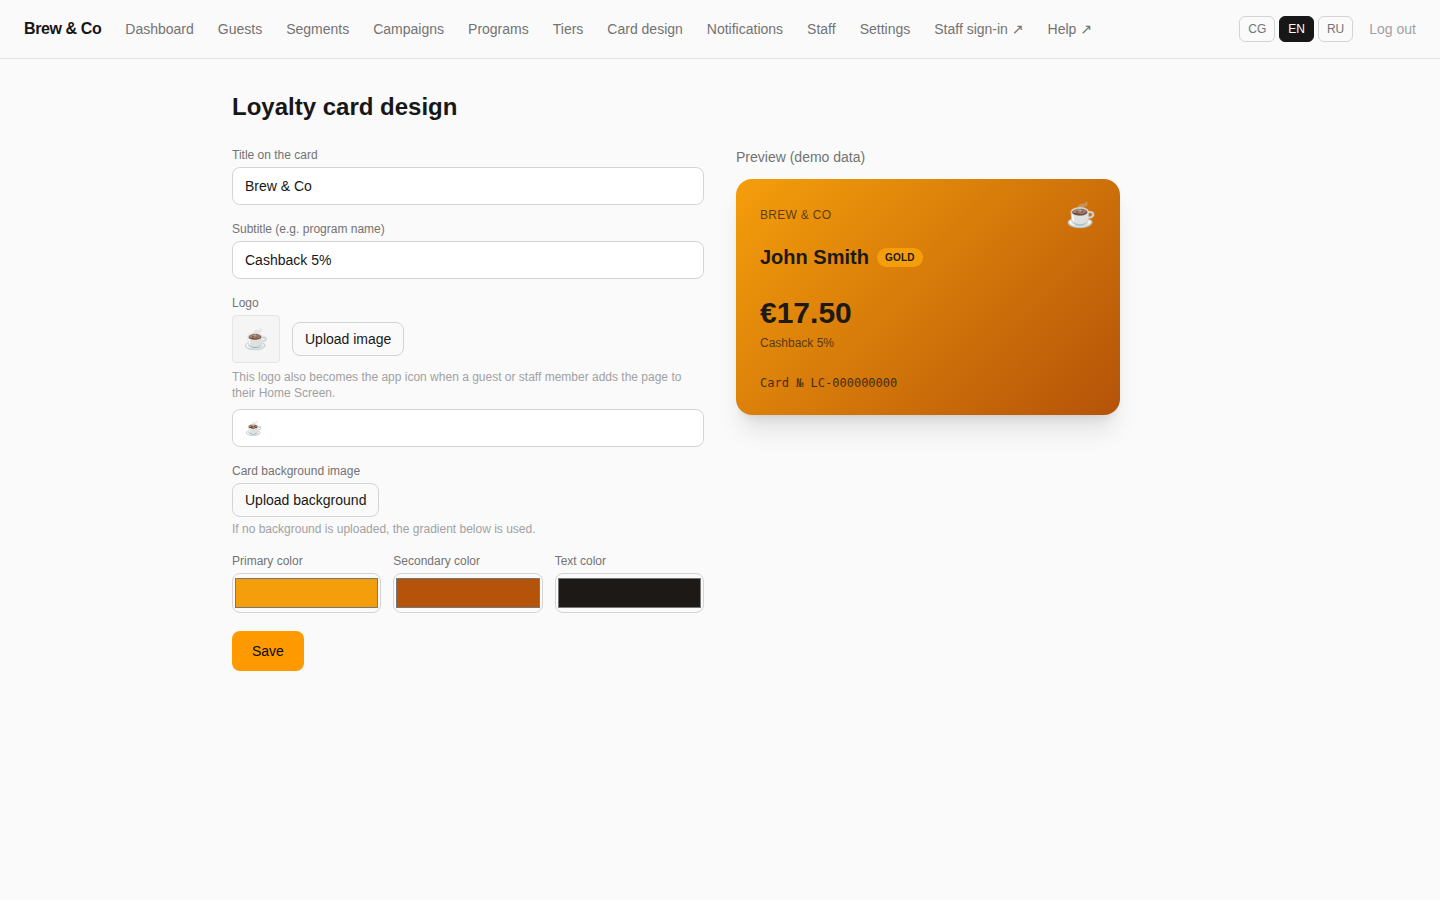
This one set of branding choices reaches three places at once:
- The guest's card page
Exactly what the preview shows — background, logo, title, subtitle, and text color.
- The join/login page header
The same branding frames the self-registration form and staff/admin sign-in screens.
- The home-screen icon
As the page itself notes: "This logo also becomes the app icon when a guest or staff member adds the page to their Home Screen." See Installing on the guest's phone.
11 Push notifications
Broadcast to everyone who's opted in.
The Push notifications page shows your current Subscribed guests count, with the reminder that "Guests enable notifications themselves on the card page ('Get bonus notifications' button)" — nothing is ever pushed to a guest who hasn't opted in. Below that, a composer (Title, Message text) sends a one-off broadcast to every subscribed guest via Send to all.
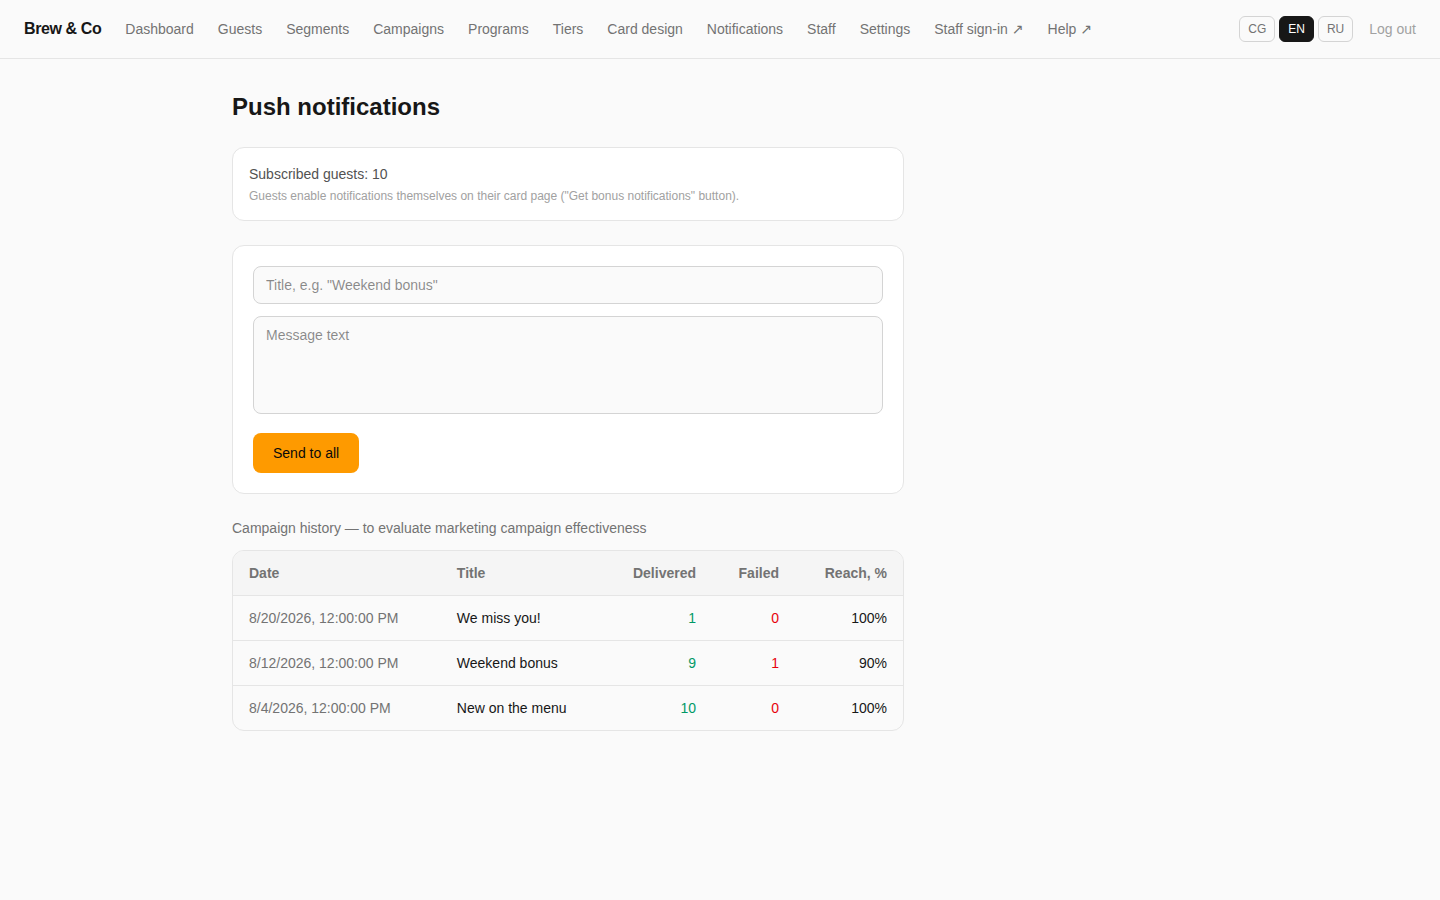
The Campaign history table below it — described on the page as being "to evaluate marketing campaign effectiveness" — logs every broadcast with Date, Title, Delivered, Failed, and Reach, %, whether it was sent manually here or triggered by an automatic campaign (see Campaigns).
Push only works once a guest has installed the card page to their home screen (see Installing on the guest's phone) — a real technical limitation, not a bug. A guest who has merely opted in but never installed the page will not receive anything, and that's expected.
12 Settings
Restaurant identity, timezone, currency, staff access, and the two links you'll share most.
Beyond the Plan and license box covered in Plans & licensing, the Settings page holds:
| Field / section | What it's for |
|---|---|
| Restaurant name | Shown across the admin panel and guest-facing pages |
| Timezone | The restaurant's local time (e.g. "Europe/Podgorica"). Drives when day-of-week/time-window loyalty program conditions fire, when birthday greetings go out, when bonus-expiration checks and reminders run, and how the dashboard's daily chart buckets activity — all follow this local time, not the server's |
| Currency | What guests see their balance, bonuses and discounts denominated in: Euro (€), British Pound (£), or US Dollar ($). This only changes how amounts are displayed — switching to £ or $ doesn't convert or re-issue anything. If this restaurant is part of a chain (see Chains), all locations must share one currency — changing it requires contacting support so every location is updated together |
| Staff PINs | Each cashier now has their own personal PIN, not one shared code — PINs are issued, reset, and revoked on the dedicated Staff page, not here |
| Tax number (PIB) | The venue's own tax identification number. Used only as an anti-fraud cross-check when a receipt is scanned at the till — it confirms the scanned receipt really did come from this venue, not a copy-pasted or mismatched one |
| Disable manual amount entry at the till | A checkbox that removes the numeric keypad from the charge screen entirely, leaving only the 🧾 Scan receipt button — purchases can then only be recorded from an actual scanned receipt. It only takes effect when receipt scanning is actually available on your plan; on BASIC the checkbox has no effect, so the till is never accidentally bricked with no way to charge a purchase |
| Bonus payment limit | A Maximum % of the check field capping how much of a bill may be paid with bonus balance at the till. Once set, the redeem flow's check-amount step (see The cashier module) becomes mandatory instead of optional, since the till needs the check total to enforce the cap |
| Staff fraud protection | An alert threshold, € and a manager-approval threshold, €, each set separately for charges and redemptions — see Staff for what each does |
| Dangerous-operation alerts | Send Telegram alerts and Send email alerts checkboxes. When a fraud-alert threshold fires, a new staff device needs approval, or a manager approval is used, the notification is pushed to a Telegram bot and/or an email inbox as well as appearing in the admin panel's own Dangerous operations list — handy so a manager doesn't have to keep that page open to notice something needs attention |
| Lock till on screen off | A checkbox that signs a cashier out the moment their phone's screen locks or turns off — useful when a shift device changes hands or might be left unattended |
| Automatic bonus expiration | An Enable bonus expiration checkbox — "If a guest hasn't visited for longer than this period, part or all of their accumulated bonus is deducted". A heads-up push reminder a few days before this happens is a separate setting, on the Campaigns page ("⏳ Bonus expiration" campaign). |
A single Save button applies these settings together. Two more boxes at the bottom give you the links you'll actually hand out:
- Staff link
This is the URL from the role table in the introduction (
/staff/{restaurant-slug}) — open it once on the shift device; each cashier then signs in with their own personal PIN. - Guest self-registration link
"A QR code for this link is on the 'Guests' page." Same link as the Self-registration QR button described in Guests — print the QR on a table tent, receipt, or physical card.
13 Chains: independent locations vs. a unified brand
Two different ways to run more than one location under the platform, with worked examples.
A chain links two or more of your restaurant's locations together so guests, and optionally programs, are recognized across all of them instead of staying siloed per location. Chains are an ENTERPRISE-plan feature and are set up by the platform team when you request it (see Plans & licensing) — you can't create one yourself from the admin panel. Once your locations are linked, a My chain link appears in the top navigation of every location in it, and a location switcher dropdown appears next to your restaurant's name.
Every chain is set up as exactly one of two modes, decided once when the platform team creates it: Independent locations or Unified brand. The mode is not a matter of degree — it's a completely different answer to the question "does this guest's card work the same way everywhere?" The rest of this section walks through both, with two real demo chains screenshotted side by side.
Nothing about chains is optional infrastructure bolted onto a single restaurant — a location inside a chain still has its own PIN-based cashier module, its own license and plan status, and (for Independent locations) its own programs, tiers, and card design, exactly as described everywhere else in this manual. A chain only changes how guest identity and, for Unified brands, configuration are shared between locations.
Independent locations
Use this mode for a group of restaurants that happen to share ownership or back-office management but are otherwise separate businesses — a hotel's beach café and its rooftop bar, for example, with different menus, different pricing, and no reason a coffee cashback bonus earned at one should be spendable at the other.
By default, an Independent location is no different from a standalone restaurant — its guests, programs, and card design are entirely its own, and a guest who signs up at one location is completely unknown at the other. The one thing a chain adds on top is the shared QR code toggle on the My chain page:
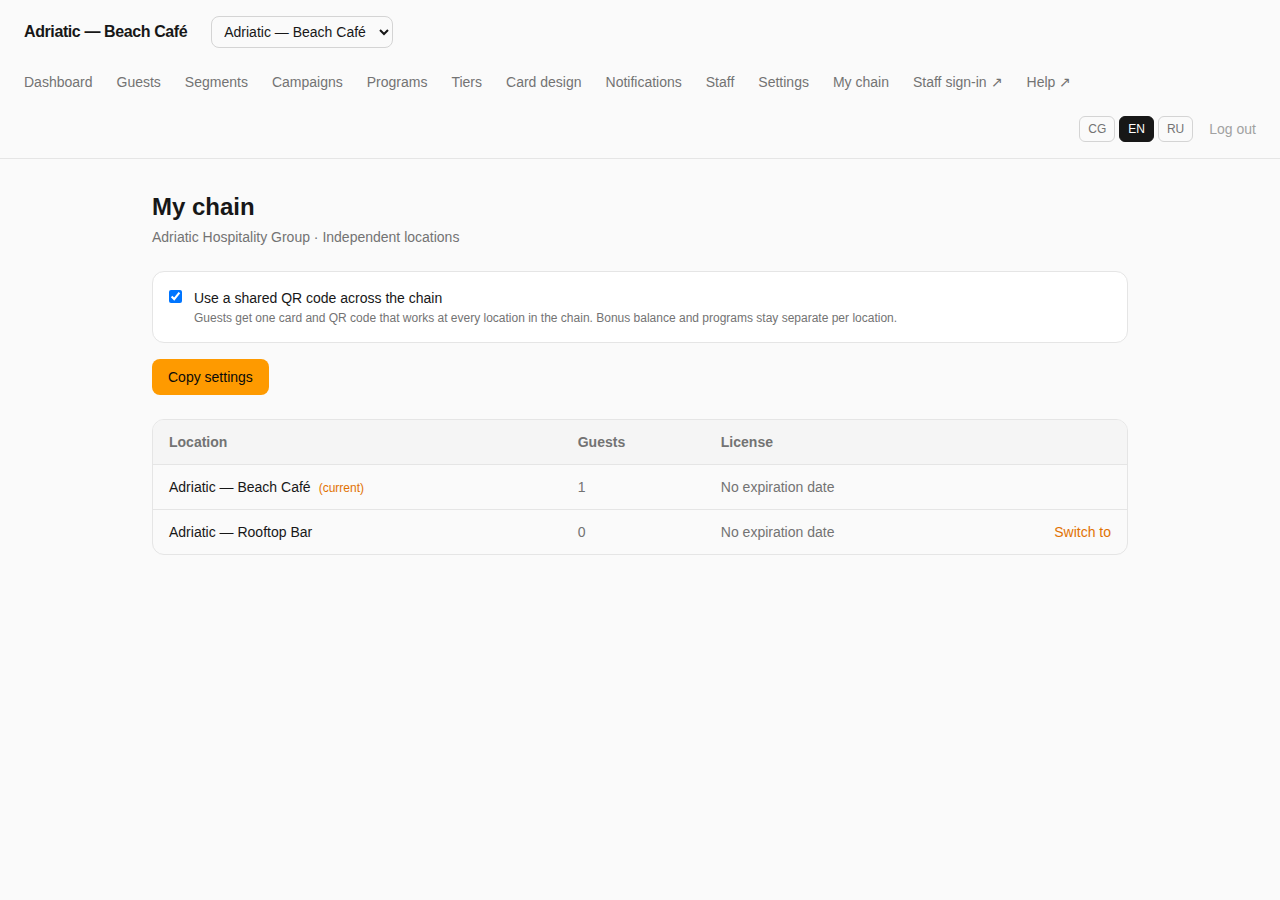
| Shared QR code | What a guest experiences |
|---|---|
| Off (the default) | A guest's card only works at the location where they signed up. Scanning it or searching for their phone/name at a sibling location finds nothing — as far as that location's staff and admin can tell, the guest doesn't exist. |
| On | The same card/QR code is recognized at every location in the chain — a guest never needs a second card. But their balance, tier, and stamp progress stay local to each location: earning cashback at one location does not add to, or even show up in, their balance at another. |
This is the one detail worth memorizing about Independent chains: turning shared QR on shares the guest's identity (their card is recognized everywhere), never their balance. Balance, tier, and stamp progress are pooled only in Unified mode — see below. If a guest asks "why doesn't my bonus from the beach café show up at the rooftop bar," this is why: it's how Independent mode is designed to work, not a bug.
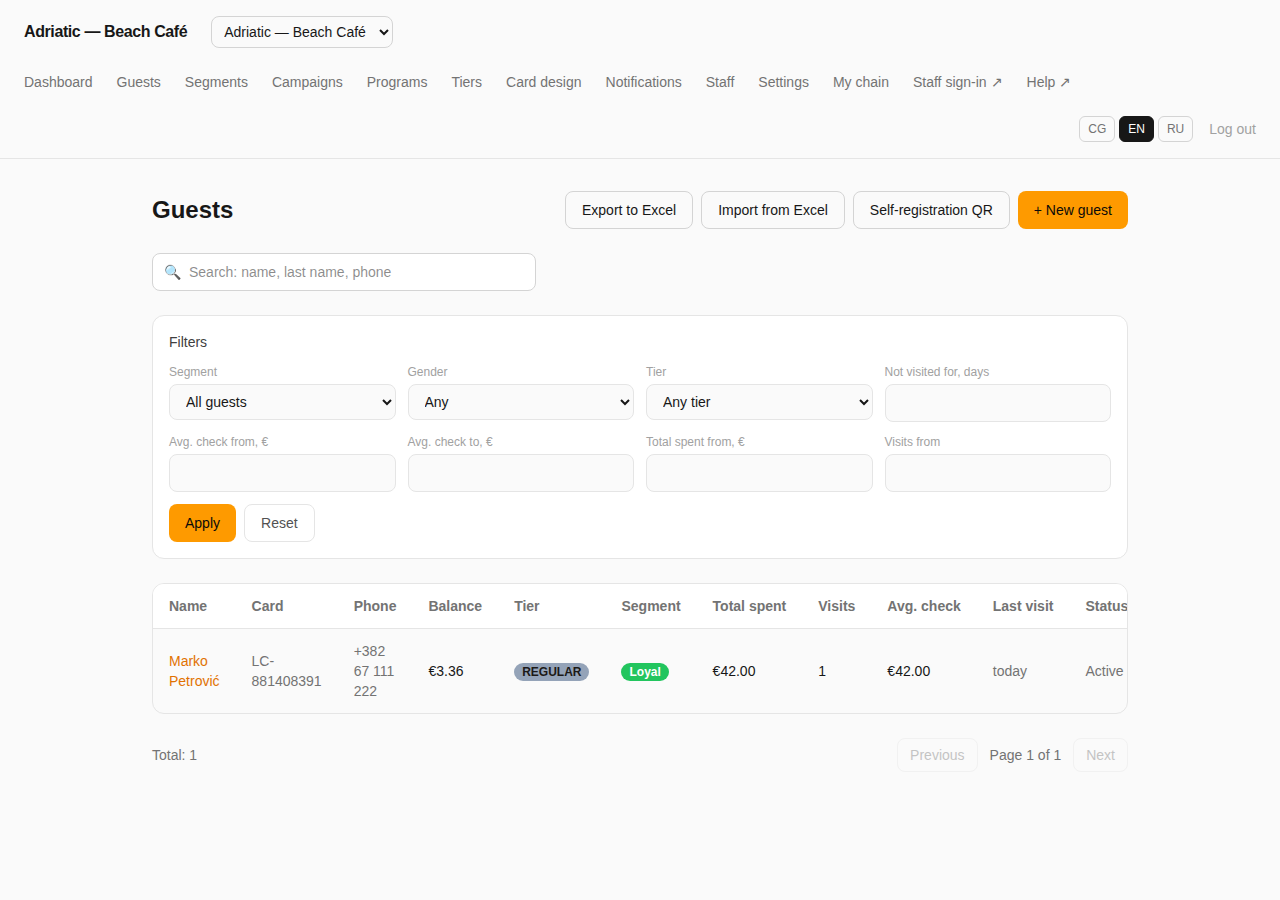
Here's that distinction in the actual demo data. Marko Petrović signs up and makes a €42 purchase at Adriatic — Beach Café, which runs its own 8% cashback program:
Switch to the sibling location, Adriatic — Rooftop Bar (via Switch to on the My chain page, or the location dropdown next to the restaurant name), and search the same card number:
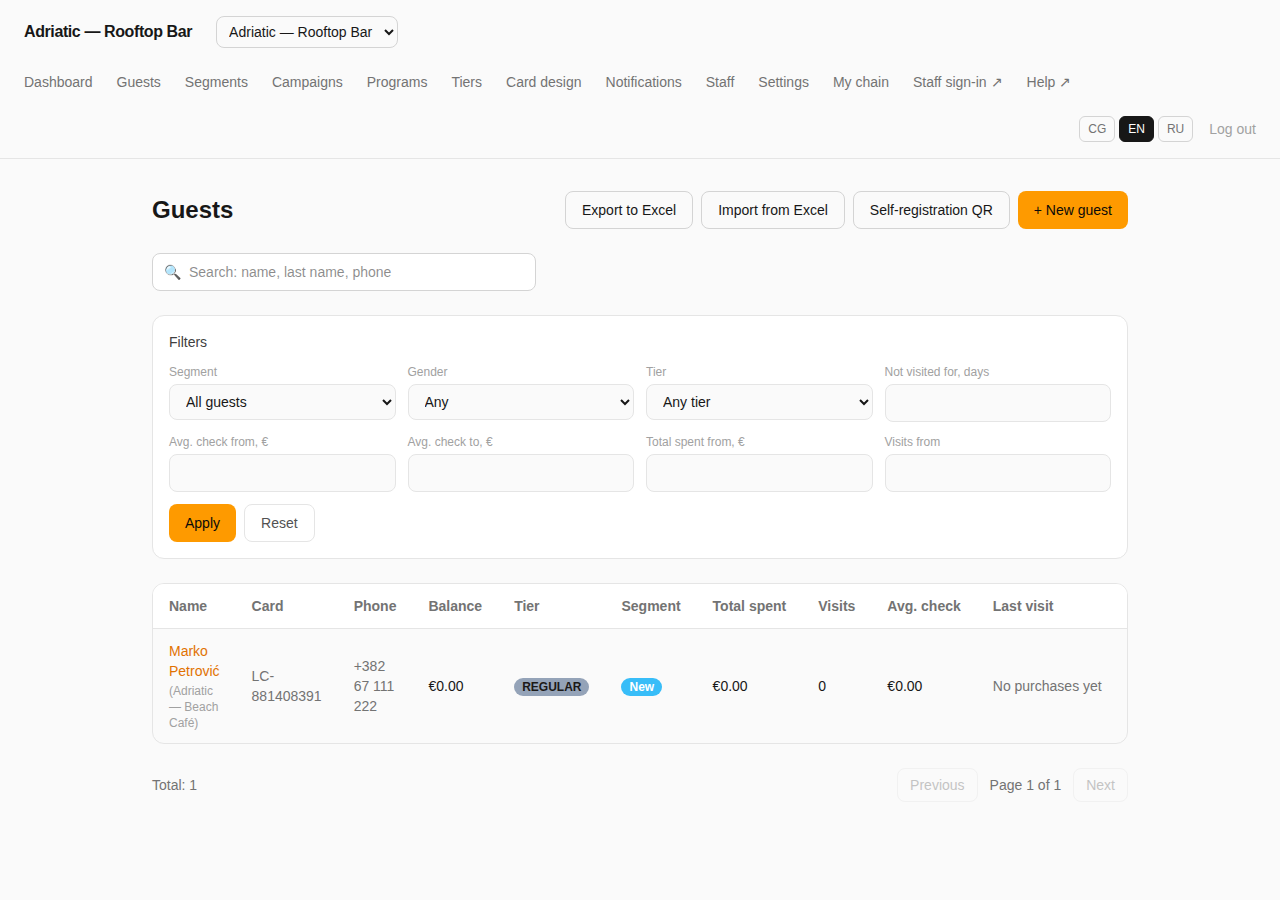
Marko's name, card number, and phone are the same at both locations — that's the shared identity at work, and it's why the Rooftop Bar's guest row shows (Adriatic — Beach Café) under his name, a small home-location tag that only appears for a guest recognized from elsewhere in the chain. But his balance, tier, segment, total spent, and visit count are each computed independently per location, starting from zero at the Rooftop Bar despite his purchase history at the Beach Café.
Two more tools exist specifically for Independent chains, both on the My chain page:
- Copy settings
A one-time, one-directional copy of the current location's tiers, programs, and card design to one or more sibling locations you pick — matched and updated by name where a name already exists on the target, created fresh where it doesn't. This is a convenience for setting up several similar locations quickly, not an ongoing sync: edit a program afterward and it does not propagate again automatically. A result panel reports exactly what was created, updated, or skipped (skipped happens when a name matches more than one thing on the target ambiguously).
- Switch to
Every location in the chain, current guest counts, and license/expiration status are listed in one table — click Switch to next to any sibling to move your admin session there instantly, without logging out and back in with different credentials. Independent-chain locations don't share a login the way Unified ones do (see below), but if you're the same owner/admin across several, this saves you from juggling separate accounts.
Unified brand
Use this mode when every location is genuinely the same loyalty program wearing different addresses — a coffee chain where a stamp card started downtown should keep counting up at the airport branch, because to the guest (and to the brand) it's one loyalty relationship, not several.
A Unified chain has exactly one login, shared across every location — created once for the chain's first ("owner") location, with every other location added later reachable only by switching into it, the same Switch to mechanism as Independent chains. There's no separate shared QR code toggle to think about: identity, balance, tier, and stamp progress are always fully shared across every location in a Unified chain — that's the entire point of the mode, so it isn't optional.
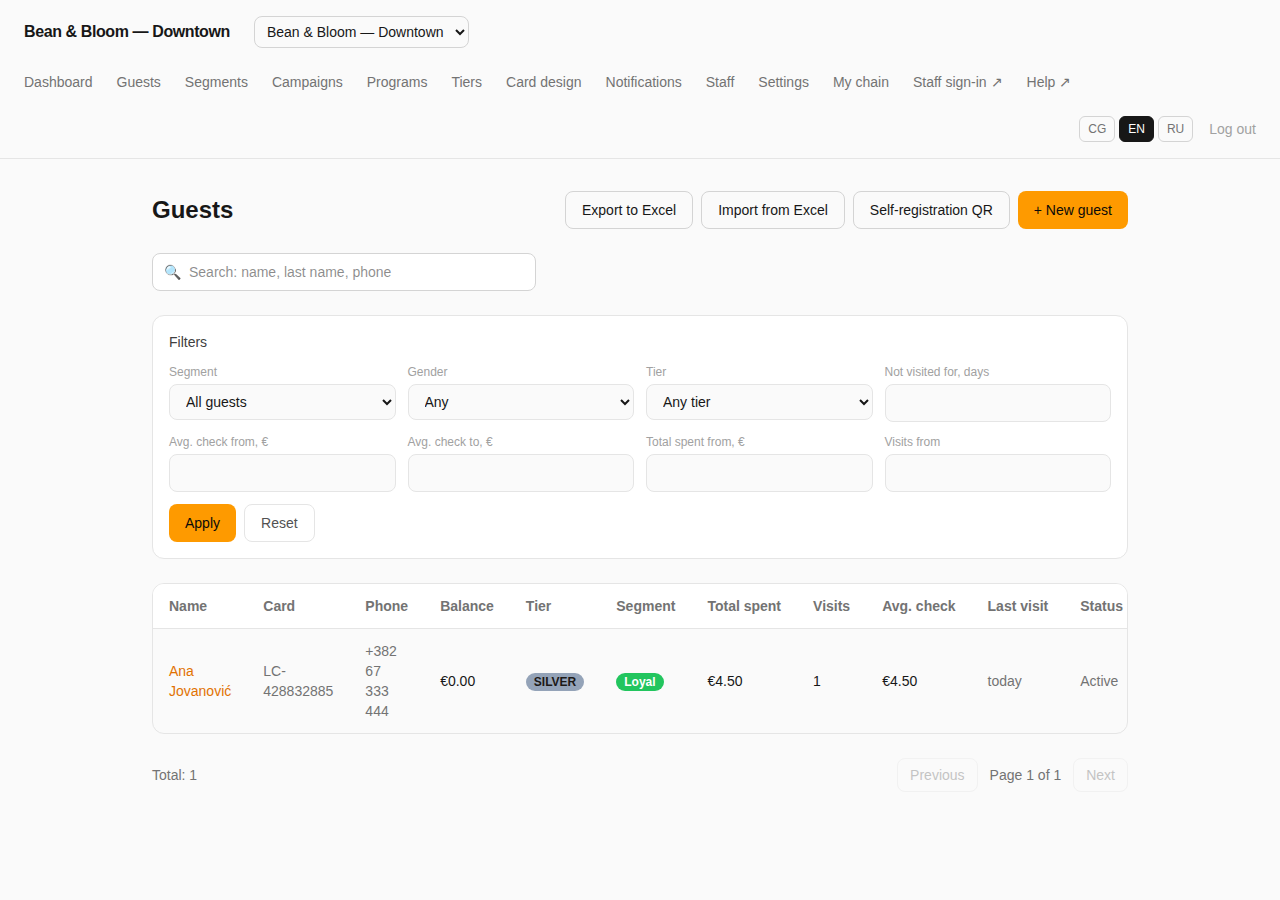
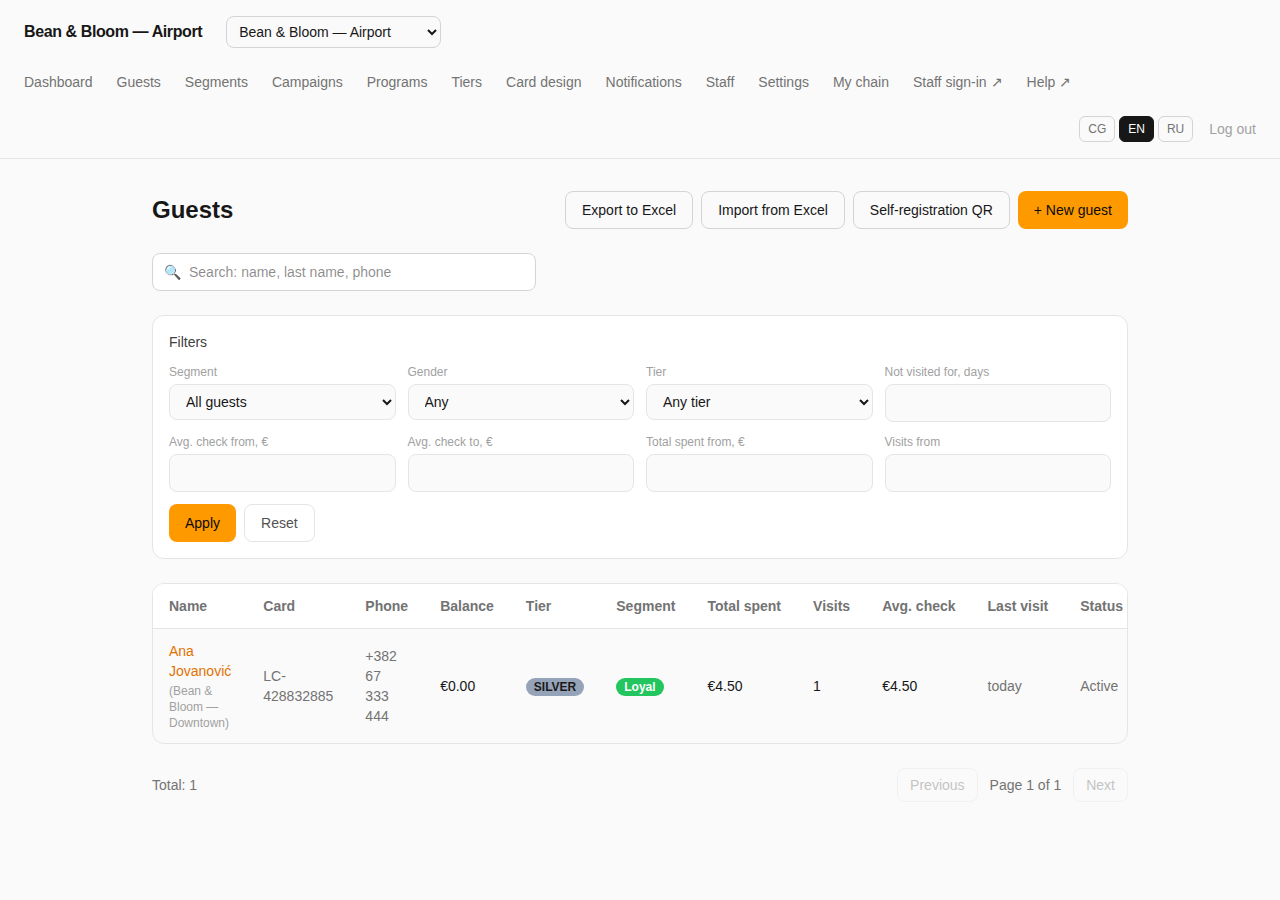
Compare this to the Independent example above: at the Rooftop Bar, Marko's numbers all reset to zero. At the Airport, Ana's numbers are exactly what they were at Downtown — €4.50 total spent, tier SILVER, one visit already counted. That's pooling, and it's what "unified" means in practice.
| Independent, shared QR off | Independent, shared QR on | Unified | |
|---|---|---|---|
| Guest recognized at a sibling location | No | Yes | Yes |
| Balance / tier / stamps pooled across locations | — | No, local per location | Yes, always |
| Programs, tiers, card design | Independent per location | Independent per location | One shared configuration |
| Admin login | Separate per location | Separate per location | One shared login, switch between locations |
Two ways a Unified brand's configuration is managed
Every Unified chain shares one configuration, but the platform has two different mechanisms for keeping it shared, and which one your chain uses changes what the My chain page and the Programs page look like. Both mechanisms produce identical results for the guest and cashier — this difference is purely about how the admin panel keeps locations in sync behind the scenes, and it's worth recognizing on screen because the wording is genuinely different.
The classic mechanism (every Unified chain starts here): each location physically holds its own copy of every tier, program, and card design setting. Editing one from any location writes through to every sibling's copy automatically and immediately — from the admin's point of view it behaves like one shared configuration, but under the hood it's N synchronized copies, not one thing.
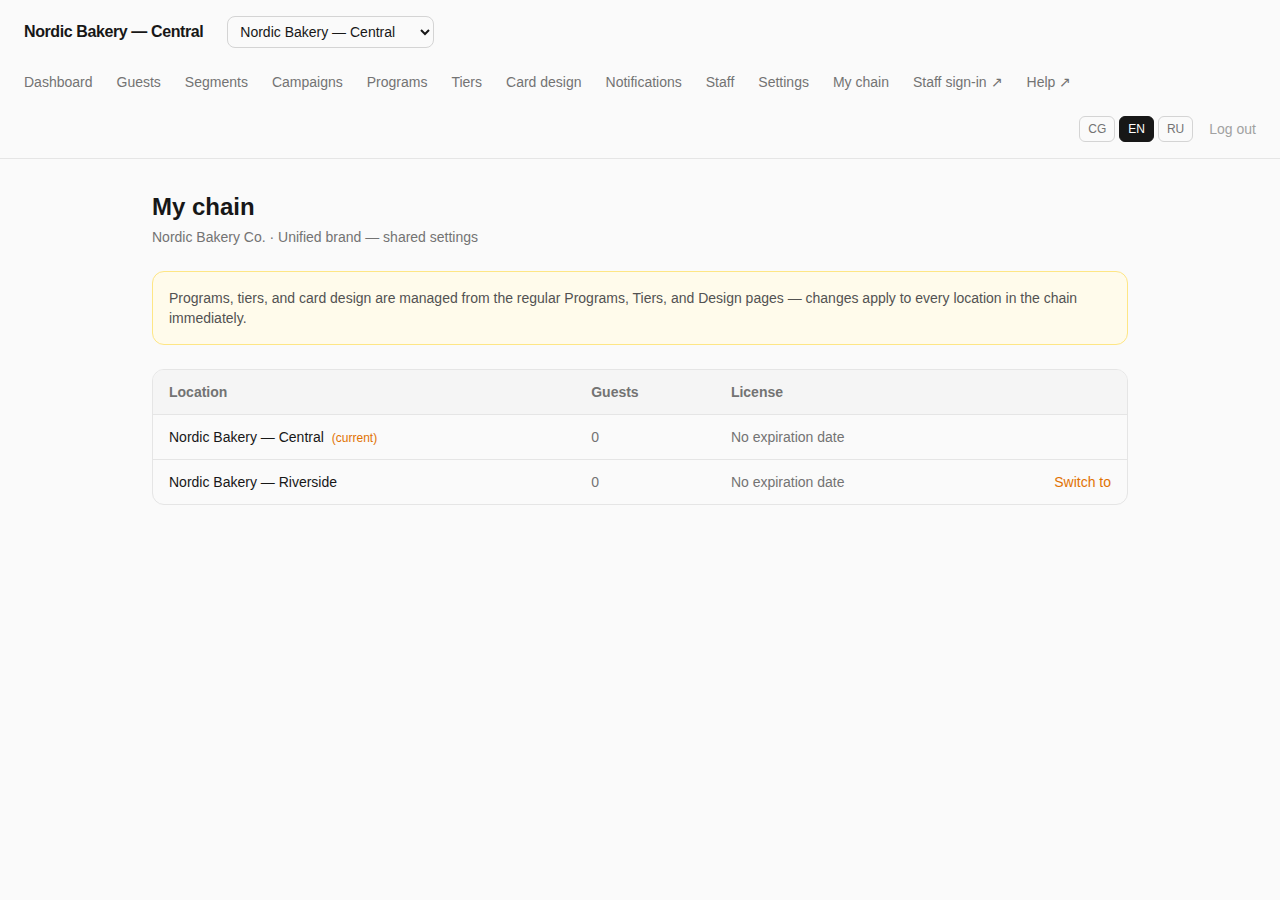
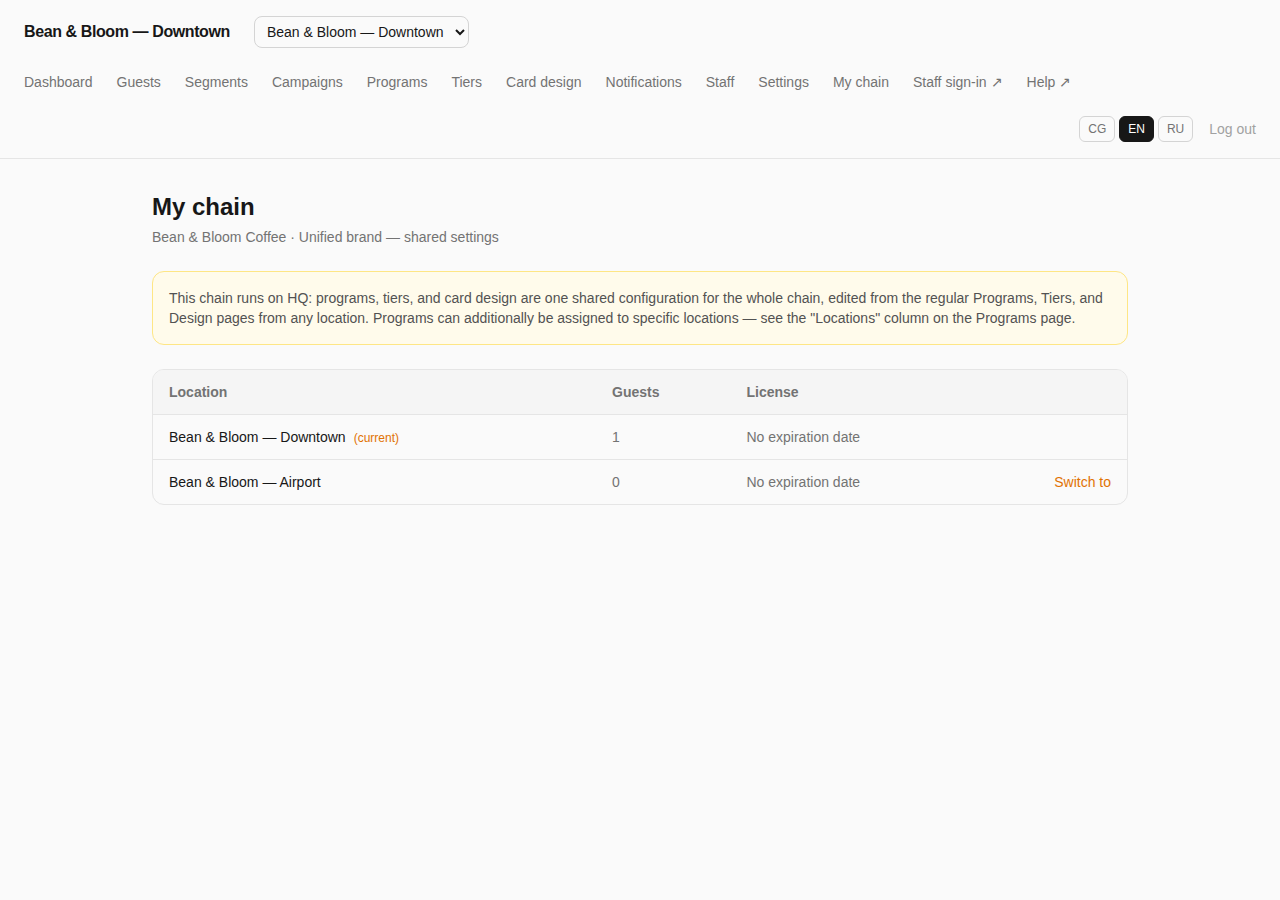
The newer HQ-owned mechanism: for chains the platform team has migrated (a one-time, reversible cutover), there is no fan-out at all — programs, tiers, and card design live as a single physical row at the chain's owner location, and every other location simply reads that one row. The My chain page's note changes to reflect this, and mentions one extra capability that only exists in this mode:
You don't need to do anything differently day to day because of which mechanism your chain uses — you still edit programs, tiers, and card design from the same regular Programs, Tiers, and Card design pages either way, from any location, and changes still apply chain-wide immediately. The only thing that changes is whether the Programs page shows a Locations column (see next).
Per-location program targeting (HQ-owned chains only)
An HQ-owned chain can additionally restrict any individual program to specific locations, instead of it always being live everywhere. This is genuinely new capability, not available on the classic synced-copies mechanism — there, a program is either active chain-wide or disabled chain-wide, nothing in between. On the Programs page of an HQ-owned chain, an extra Locations column appears with one toggle chip per location:
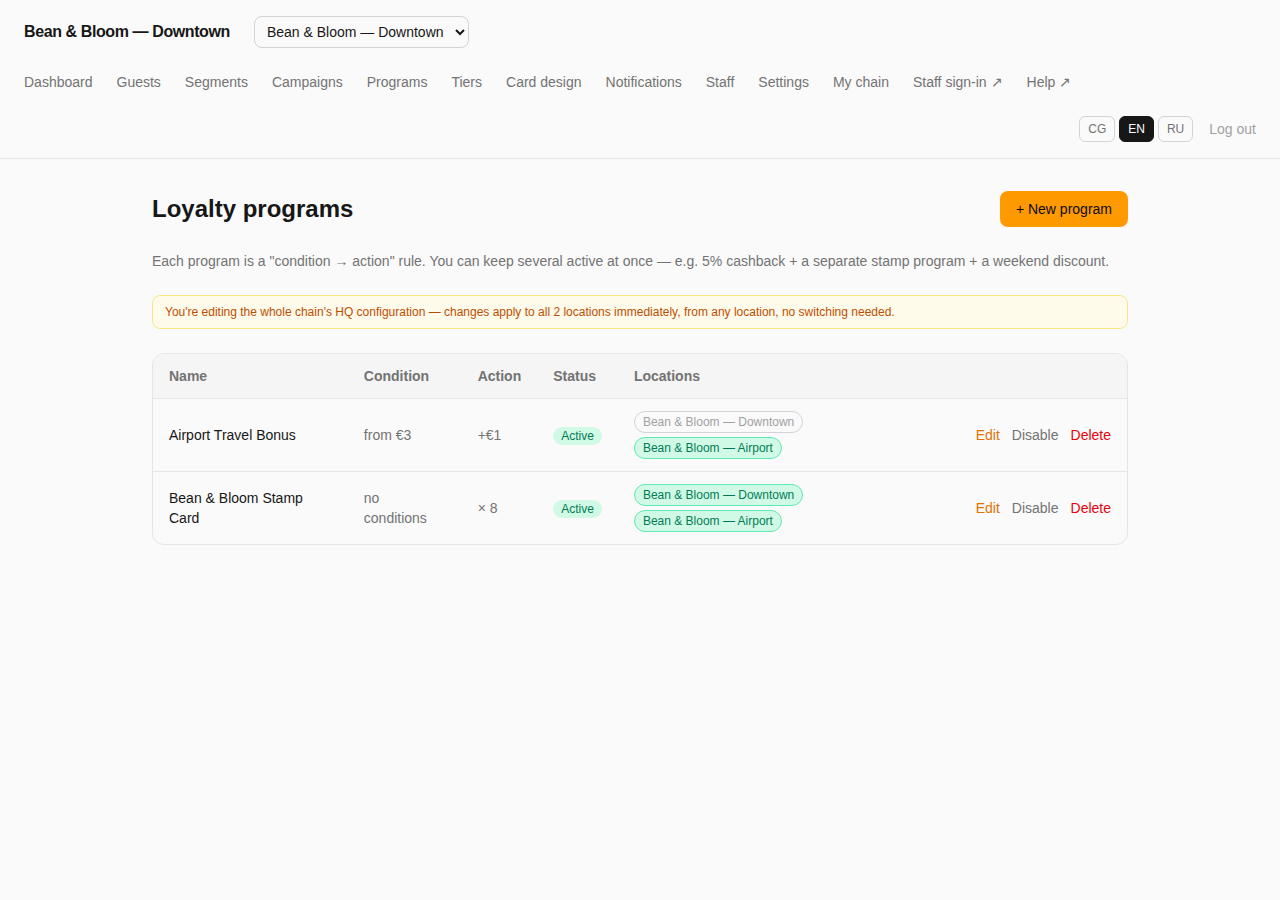
Click a location's chip to toggle that program on or off there — green means active at that location, grey means not. A brand-new program created on an HQ-owned chain starts with no locations targeted at all (an explicit, deliberate choice on the platform's part — a program never silently goes live somewhere by default); switch every chip on to make it behave like the classic "everywhere at once" model, or leave it partial for something like an airport-only travel bonus that shouldn't apply to guests who never leave downtown.
A new location added to an already HQ-owned chain is an exception to "starts with nothing targeted" above — it automatically inherits every program that's currently active chain-wide, exactly like joining a classic Unified chain would. Targeting is something you narrow deliberately afterward, not something a new location has to be manually opted into from zero.
Choosing between the two chain types
This is a decision the platform team makes with you when a chain is set up, not something you configure yourself later — but it helps to know which questions decide it:
- Should a bonus earned at one location be spendable at another? If yes, that's Unified. If each location should keep its own books, that's Independent.
- Do all locations run genuinely the same menu of programs, tiers, and branding — or does each one need its own pricing, its own tier thresholds, its own look? Same everywhere points to Unified; meaningfully different points to Independent.
- Do you still want a guest's card to be recognized (even if their balance isn't shared) across locations that otherwise run independently — e.g. so a hotel's front desk can look up a guest who's also a regular at its restaurant? That's Independent with shared QR code turned on — the middle ground between the two extremes.
14 Staff: PINs, roles & devices
Every cashier's personal PIN, roles, and approved devices, in one place.
The Staff page is where you manage everyone who touches the till — from issuing a cashier's first PIN to approving a new device. It's built from two panels.
Cashiers
A table of everyone with till access: name, role, and status. Each cashier has their own personal PIN, separate from everyone else's. Per row:
- Role — a Cashier / Manager dropdown. A Manager can approve another cashier's transaction that crosses the manager-approval threshold (see below and Settings) by entering their own PIN.
- Reset PIN — issues a fresh PIN if the old one is forgotten, or if you suspect it's been seen by someone it shouldn't have.
- Deactivate — removes till access without deleting anything; past transactions still correctly show who processed them.
A + New cashier button adds someone new: name, role, and an auto-generated PIN you hand to them once, in person.
Devices
The first device a cashier signs in from is approved automatically. Any later new device — a replacement phone, or someone attempting a known PIN from an unfamiliar device — shows up here pending approval, and sign-in on it is blocked until an admin or manager taps Approve. Already-approved devices can be pulled at any time with Revoke, e.g. after a lost phone or a departing employee.
Requiring new-device approval adds a real barrier against someone who learns a cashier's PIN quietly signing in from their own phone — knowing the correct PIN alone isn't enough on an unapproved device.
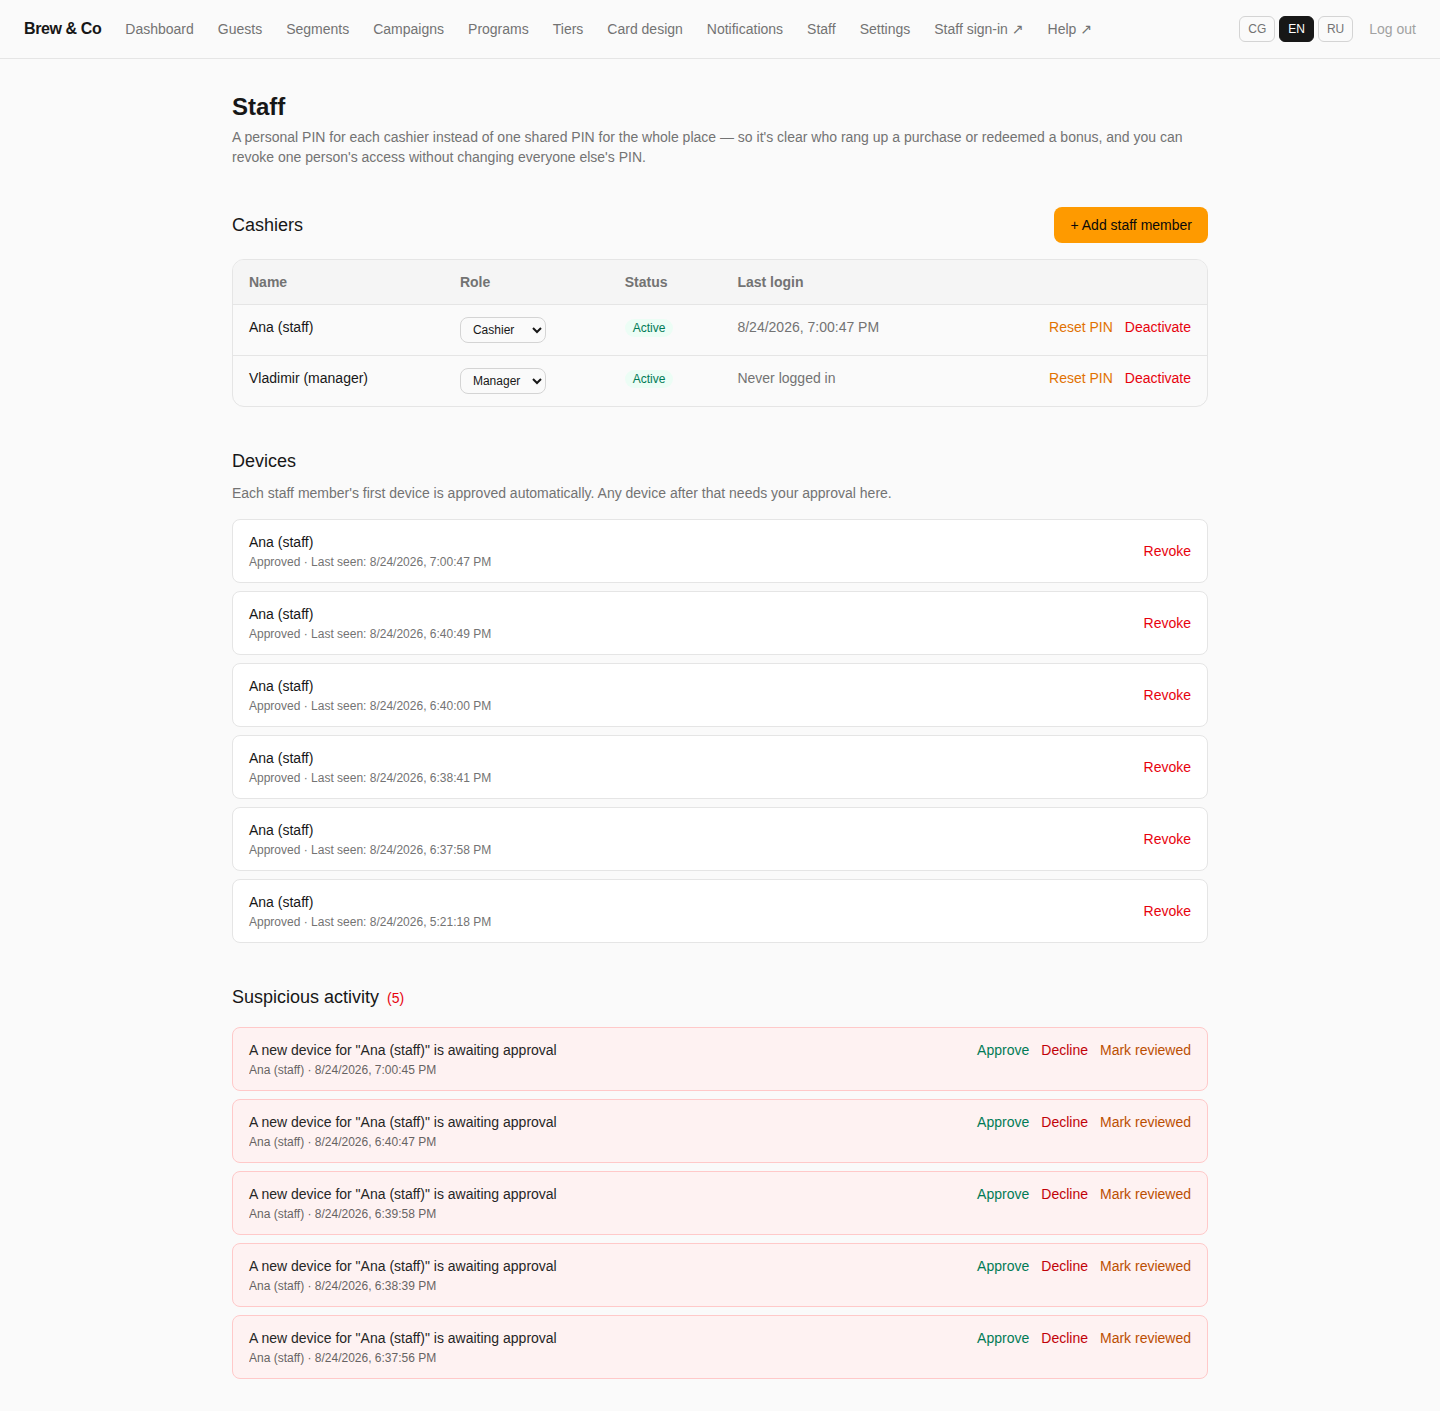
Reviewing flagged transactions used to live at the bottom of this page as a "Suspicious activity" list — it has since moved to its own standalone Dangerous operations page in the main navigation, alongside pending device approvals and manager-approval events. If you're looking for that list, that's where it is now.
15 The cashier module
What staff see at the till — covered in full depth in the separate cashier quick guide.
Cashiers use a stripped-down, PIN-only, mobile-friendly module — no email, no menus beyond what a till needs. Each cashier signs in with their own personal PIN, issued and managed on the Staff page, not a single shared code.
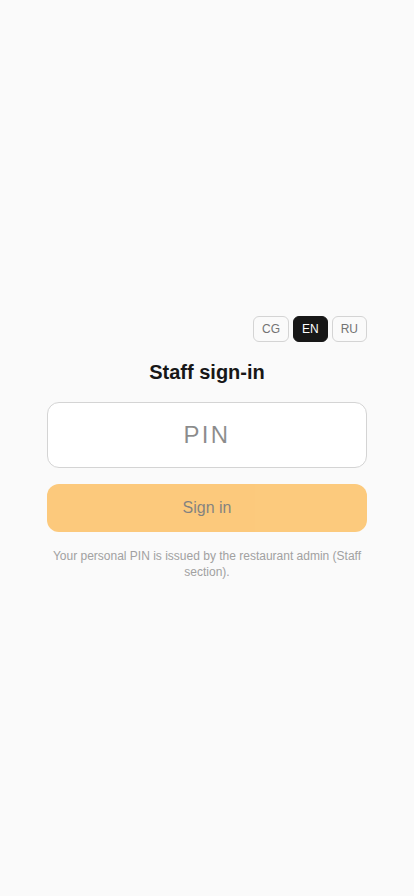
- Sign in with your personal PIN
The Staff sign-in screen — a PIN field and a Sign in button. The first device a cashier signs in from is approved automatically; signing in from a new device afterward may need an admin or manager's approval (see Staff).
- Find the guest
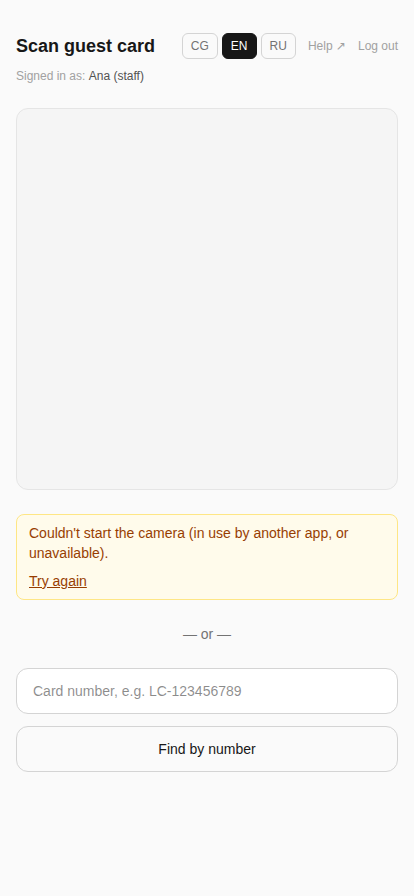
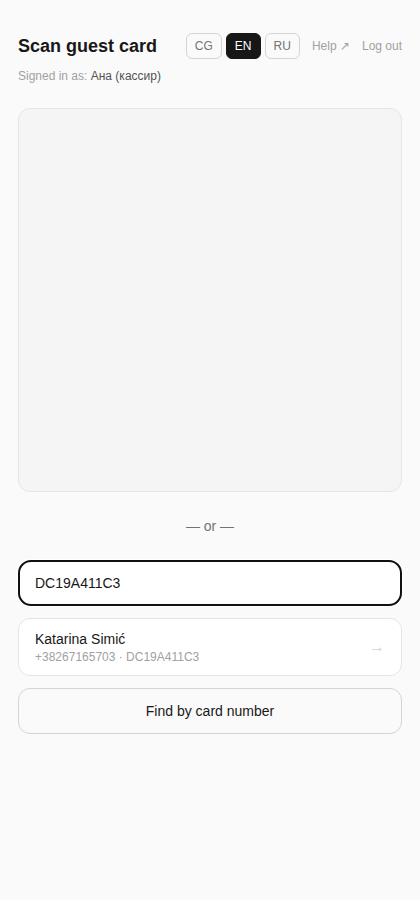
There are three ways in, all landing on the same screen: point the camera at the guest's QR code and it opens their card automatically; start typing a name, phone number, or card number into the search field under the camera and matching guests appear live, before any button is pressed — tap the right row; or, if you already know the card number in full, type it and tap Find by number to skip the list. If the camera can't start, a yellow warning appears above the search field and the same live search works exactly as it would otherwise — manual lookup isn't a fallback bolted on for emergencies, it's an everyday way to find someone.
- Charge or redeem
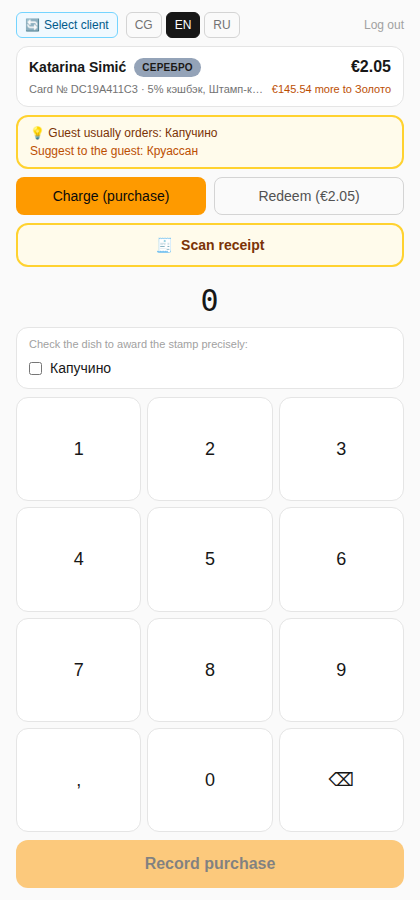
Once a guest is found, the top bar (language switcher and Log out) also gains a 🔄 Select client button, so you can jump to the next guest at any point without scrolling back up through the charge screen. Below it sits a compact single-line guest summary — name, tier badge, balance, card number, active program names, and a tier-progress hint — followed by the Charge (purchase) / Redeem (€X.XX) mode toggle and, in Charge mode, the keypad. See the dedicated steps below for what appears above that keypad before you type anything.
Charging a purchase
With Charge (purchase) selected (the default, highlighted orange), the guest's compact info row is followed by whatever the plan and the active programs make relevant to this specific guest, all visible before a single digit is typed:
- On a Pro+ plan, a yellow recommendation banner can appear right away: 💡 Guest usually orders: <dish> (or, for a guest who hasn't been in for a while, "hasn't visited in a while, usually ordered <dish>"). If that dish also has a configured item pairing, the same line grows a second clause: "Suggest to the guest: <paired dish>." It's built entirely from the guest's scanned-receipt history and the Item pairings list, so it's absent on BASIC, where there's no scanned history to draw the recommendation from.
- If any active stamp program requires a specific dish (see Loyalty programs), a checklist block appears above the keypad — Check the dish to award the stamp precisely — with one checkbox per qualifying dish. This works on every plan, since it's a manual tick, not a scan.
- If receipt scanning is available on the plan, a 🧾 Scan receipt button sits above the keypad too, leading to the dedicated scanning screen below.
From there, key in the bill total and tap Record purchase — every matching active program applies automatically, with nothing to pick manually.
If an admin has turned on Disable manual amount entry at the till in Settings and receipt scanning is available on the plan, the numeric keypad is removed entirely — the 🧾 Scan receipt button plus explanatory text is all that's shown, and a purchase can only be recorded from an actual scanned receipt.
If the amount exceeds the manager-approval threshold, € set in Settings, a regular cashier's PIN isn't enough — the screen asks for a manager to approve by entering their own PIN right there. Smaller operations still go through with just the cashier's own PIN, as usual.
Scanning a receipt
Tapping 🧾 Scan receipt from the charge screen opens a dedicated Scan the receipt's QR code screen. This is the same QR code printed on an ordinary paper till receipt — the one that links to the tax authority's site — and it's a different code from the guest's own card QR: the guest is already selected at this point, and this screen is only reading the paper receipt for the purchase just rung up. A Cancel link returns to the ordinary charge screen at any time.
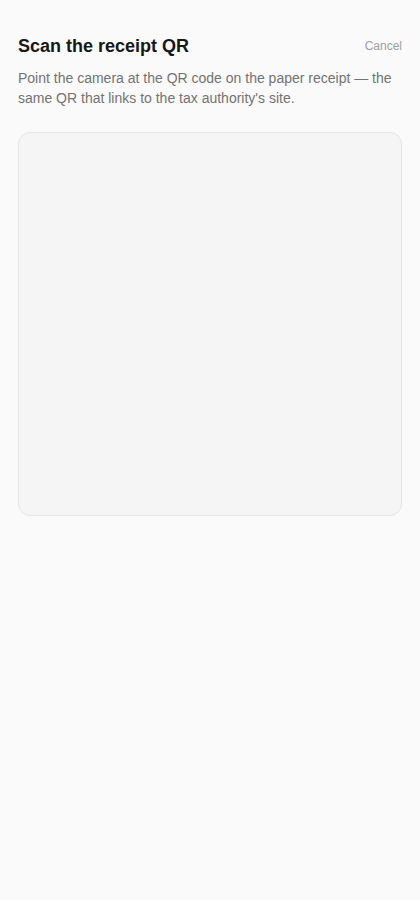
On success, the server fetches the receipt's verified item list and total straight from the tax service and applies the purchase automatically — no amount typing at all — then shows a result screen with a checkmark, what was applied, and the same recommendation/paired-item hint if one applies. On failure (the tax service is down, the receipt was already scanned once before, or the QR code is unreadable), the screen shows an error and, for anything that looks like an external-service hiccup, an Enter manually button that falls back to the ordinary keypad screen. Scanning is built to never fully block the till — there's always a manual way through.
Redeeming a bonus
Switching to Redeem (€X.XX) mode starts a two-step flow instead of a single amount field:
- Step 1 — check amount
An optional Check amount field, entered on the same keypad, with Skip and Next buttons. Skip is hidden — the field becomes mandatory — when the restaurant has set a Bonus payment limit in Settings, since the till needs the check total to enforce that cap.
- Step 2 — bonus amount
Enter how much of the balance to redeem. As soon as it's non-zero, a live box appears underneath: green with Payable: €X.XX and Discount off the check: Y.Y% once the amount is valid, or red with a validation message if it exceeds the check total or the org's % cap. A ‹ Back link returns to step 1 to change the check amount.
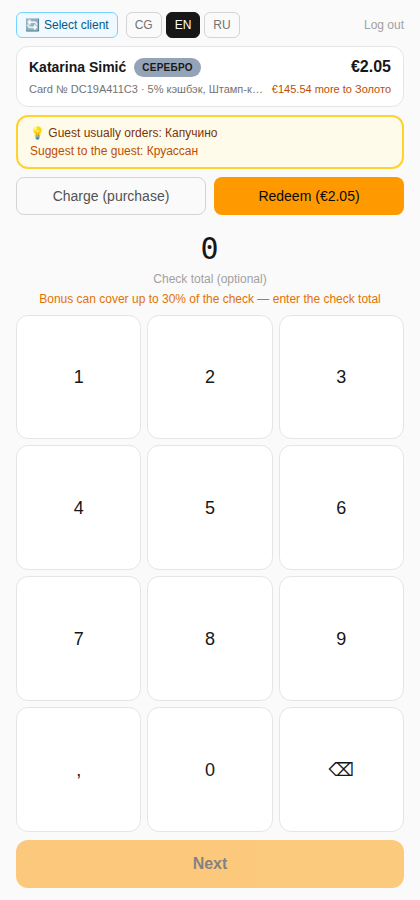
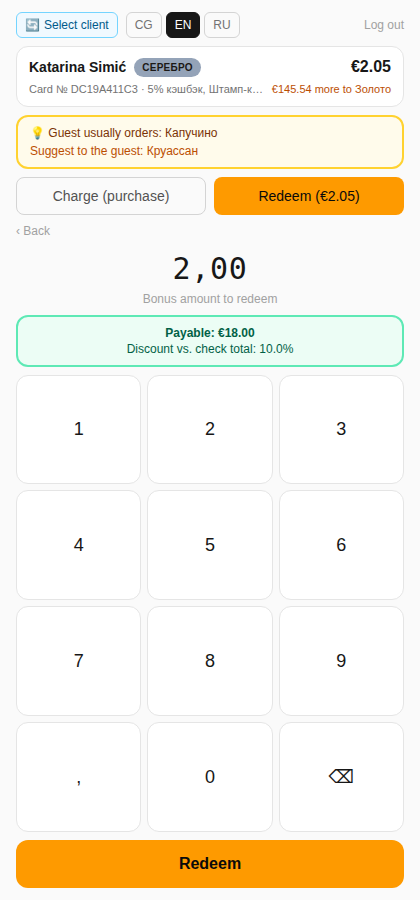
If a guest holds balance across more than one cashback program, both steps still work against one combined total — the cashier is never asked to choose which program to draw from.
Granting a stamp reward
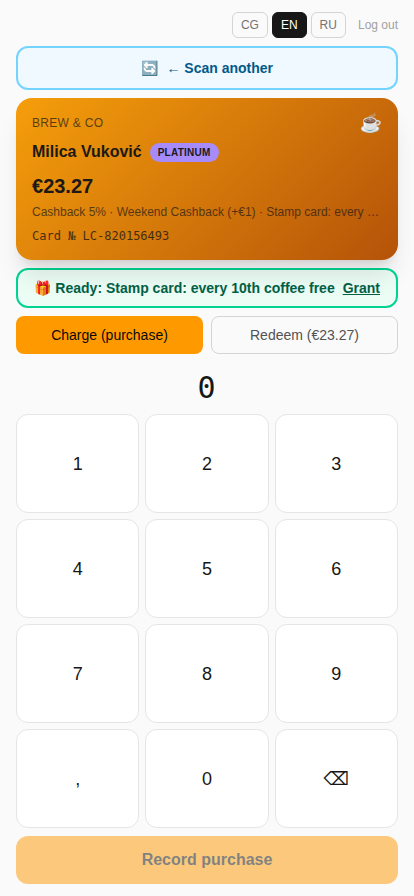
If a stamp-card reward is ready, a green banner reading e.g. 🎁 Ready: Stamp card: every 10th coffee free appears above the mode toggle, in both Charge and Redeem mode, with a Grant link. Tapping it replaces the need for any amount entry entirely.
For the condensed, till-side version of this whole section, with more troubleshooting scenarios for a busy shift, see the dedicated cashier quick guide.
16 The guest card
Everything a guest sees about their own loyalty status.
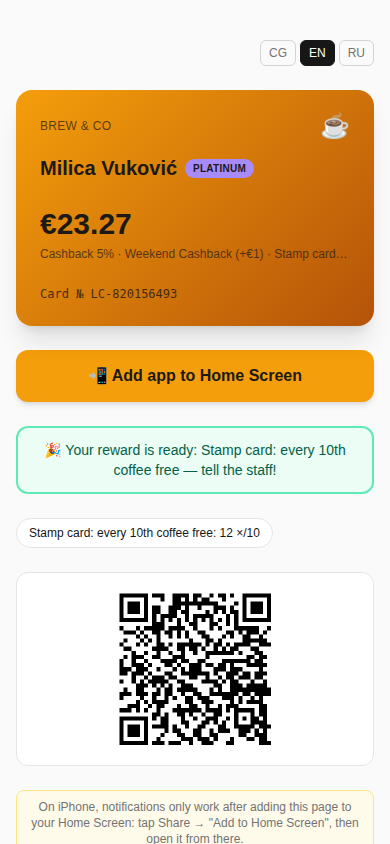
A guest's personal card page is the one screen they'll return to over and over. Top to bottom, it shows:
- Restaurant name and logo, in the branding set on the Card design page
- The guest's name and tier badge (e.g. "Milica Vuković" with a "PLATINUM" badge)
- Their total combined balance, and a one-line summary of active programs underneath
- Their card number (e.g. "Card № LC-820156493")
- An Add app to Home Screen button (see Installing on the guest's phone)
- A reward-ready banner when applicable — e.g. "🎉 Your reward is ready: Stamp card: every 10th coffee free — tell the staff!"
- A stamp-card progress chip when applicable, e.g. "Stamp card: every 10th coffee free: 12 ×/10"
- A personal QR code, for the cashier to scan or for the guest to save/share
- A Get bonus notifications opt-in toggle, and any push messages already received under a Notifications heading
- A full Transaction history — every earn and redeem, with a plain-language description (e.g. "+€0.78 cashback (5%) — 'Cashback 5%'") and the amount. Once the history spans enough time, older entries collapse into per-month groups — the newest month is expanded by default, and a header like "May 2026 (12 transactions)" expands the rest on tap, so a long history doesn't turn into an endless scroll.

This is the same underlying data as the admin guest detail page (Guests) — a guest can always see exactly what you can see about their own balance and history, nothing hidden.
17 Installing on the guest's phone
No native app — a home-screen install, with one platform-specific catch.
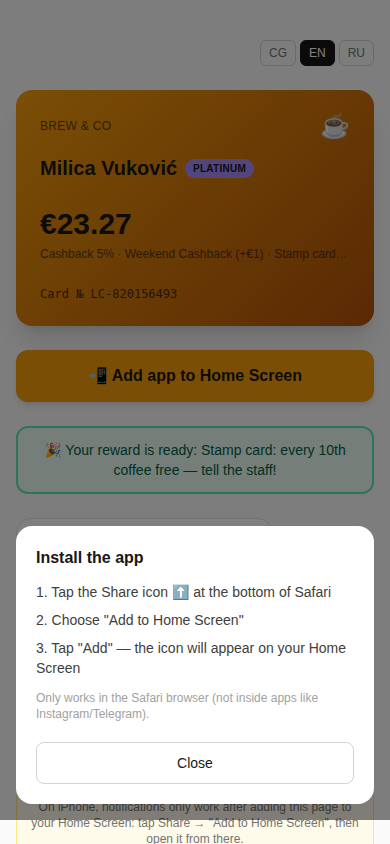
There's no app-store app. The guest's card page is installed straight from the browser as a PWA (progressive web app) via the Add app to Home Screen button, which behaves differently depending on the guest's platform.
| Platform | What happens |
|---|---|
| iOS Safari (iPhone) | No browser API can trigger install directly, so the button opens an instruction dialog: "1. Tap the Share icon ⬆️ at the bottom of Safari · 2. Choose 'Add to Home Screen' · 3. Tap 'Add' — the icon will appear on your Home Screen." |
| Android Chrome | The browser's native one-tap install prompt fires directly — tapping the button triggers the OS's own "Add to Home Screen" / "Install app" confirmation, no manual steps. |
| Any other browser | A generic fallback: open the browser's own menu (usually ⋮ top-right) and look for "Install app" / "Add to Home Screen". |
The iOS instructions only work from Safari itself — not from an in-app browser (Instagram, Telegram, Messenger, etc.). The install dialog says as much: "Only works in the Safari browser (not inside apps like Instagram/Telegram)." If a guest opened your link from a chat app, they must first tap that app's own "open in Safari" / "open in browser" option before the Share-icon steps will work at all.
Once installed, the home-screen icon uses the restaurant's own logo and color scheme from Card design — and, critically, this is also the point at which push notifications start actually working for that guest (see Push notifications).
18 A note on multilingual guests
Free-text names don't get auto-translated — plan for it.
Program names, tier names, segment names, and card design text (title/subtitle) are all free text you type once when creating them. They are not automatically translated per guest language — the platform's own EN/RU/CG switcher only translates its own interface labels, never text you entered yourself. This demo restaurant happens to have named everything in English ("Cashback 5%", "Platinum", "Champions"), which is why every screenshot in this manual reads cleanly in English — but if your own restaurant's owner types those same fields in Russian or Montenegrin, that's exactly how every guest will see them too, regardless of which language they've switched their own interface to.
If your guests read different languages, a program named entirely in one language will show that way to everyone, regardless of which language they've switched their own view to. This is real, current product behavior, not a bug — plan your naming around it:
- Favor universal terms where you can — numbers, %, and emoji read the same in every language (e.g. "☕ ×10" instead of a sentence).
- Where a word is unavoidable, pick one short and recognizable across your guests' languages rather than a full phrase.
- Remember this applies to tier badges too, since they're shown next to every guest's name everywhere — the admin guest list, the guest detail page, and the guest's own card.
19 Menu
Your dish catalog — name and price, available on every plan.
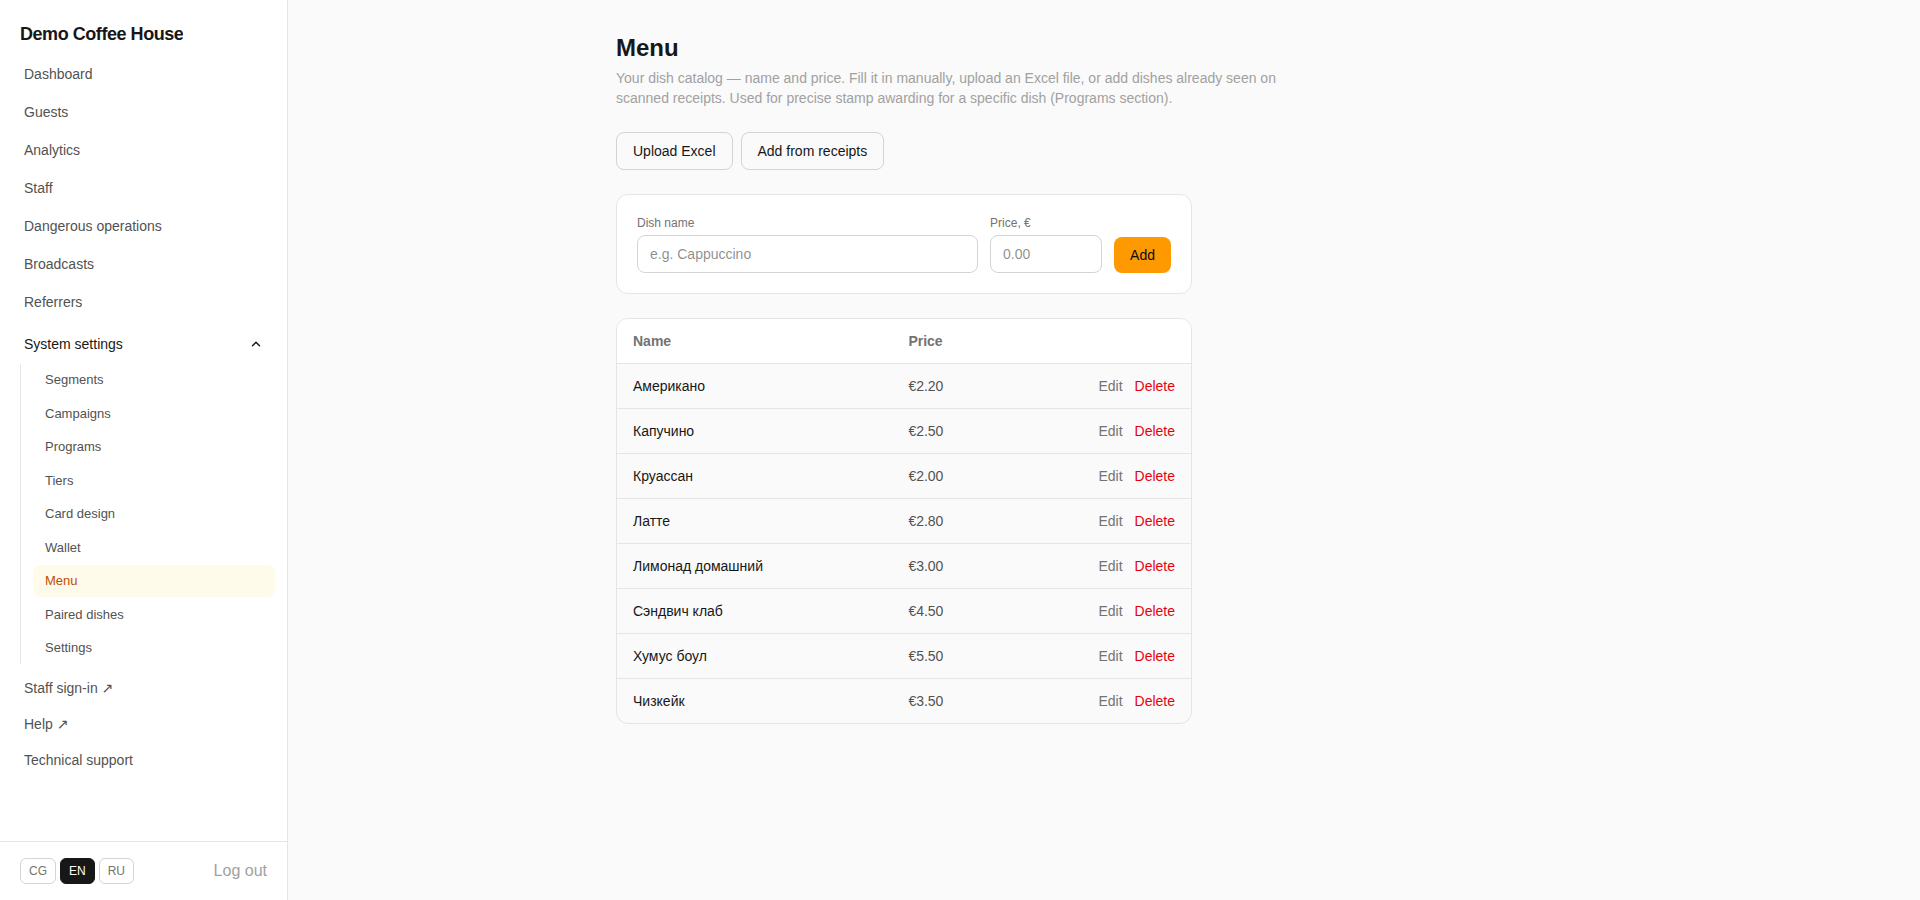
The Menu page is a simple dish catalog: just a name and a price per item. It doesn't require receipt scanning itself, so it's available on BASIC too — its main job today is supplying the dish list for the "award stamp only for a specific dish" condition described in Loyalty programs, which is itself a Basic-friendly feature.
There are three ways to add dishes:
- Add one by hand
Fill in a name and price in the form at the top and tap Add.
- Upload Excel
Bulk-import a whole menu at once — the same pattern as the Guests Excel import.
- Add from receipts
Surfaces dish names the platform has already seen on scanned fiscal receipts, with a checkbox next to each — tick the ones you want and add them all in one click, no typing. Naturally this option has nothing to show until receipt scanning has been in use for a while, so it's the one part of this page that's practically tied to a Pro+ plan even though the page itself isn't.
The table below the add options lists every dish with Name, Price, and Edit / Delete actions.
20 Analytics
Everything built from scanned-receipt data — which dishes actually drive the business, and when guests show up.
Analytics is built entirely from scanned fiscal receipts, so it needs receiptFeaturesEnabled on — it's unavailable on BASIC (see Plans & licensing). Without scanned receipts there's simply no data to analyze.
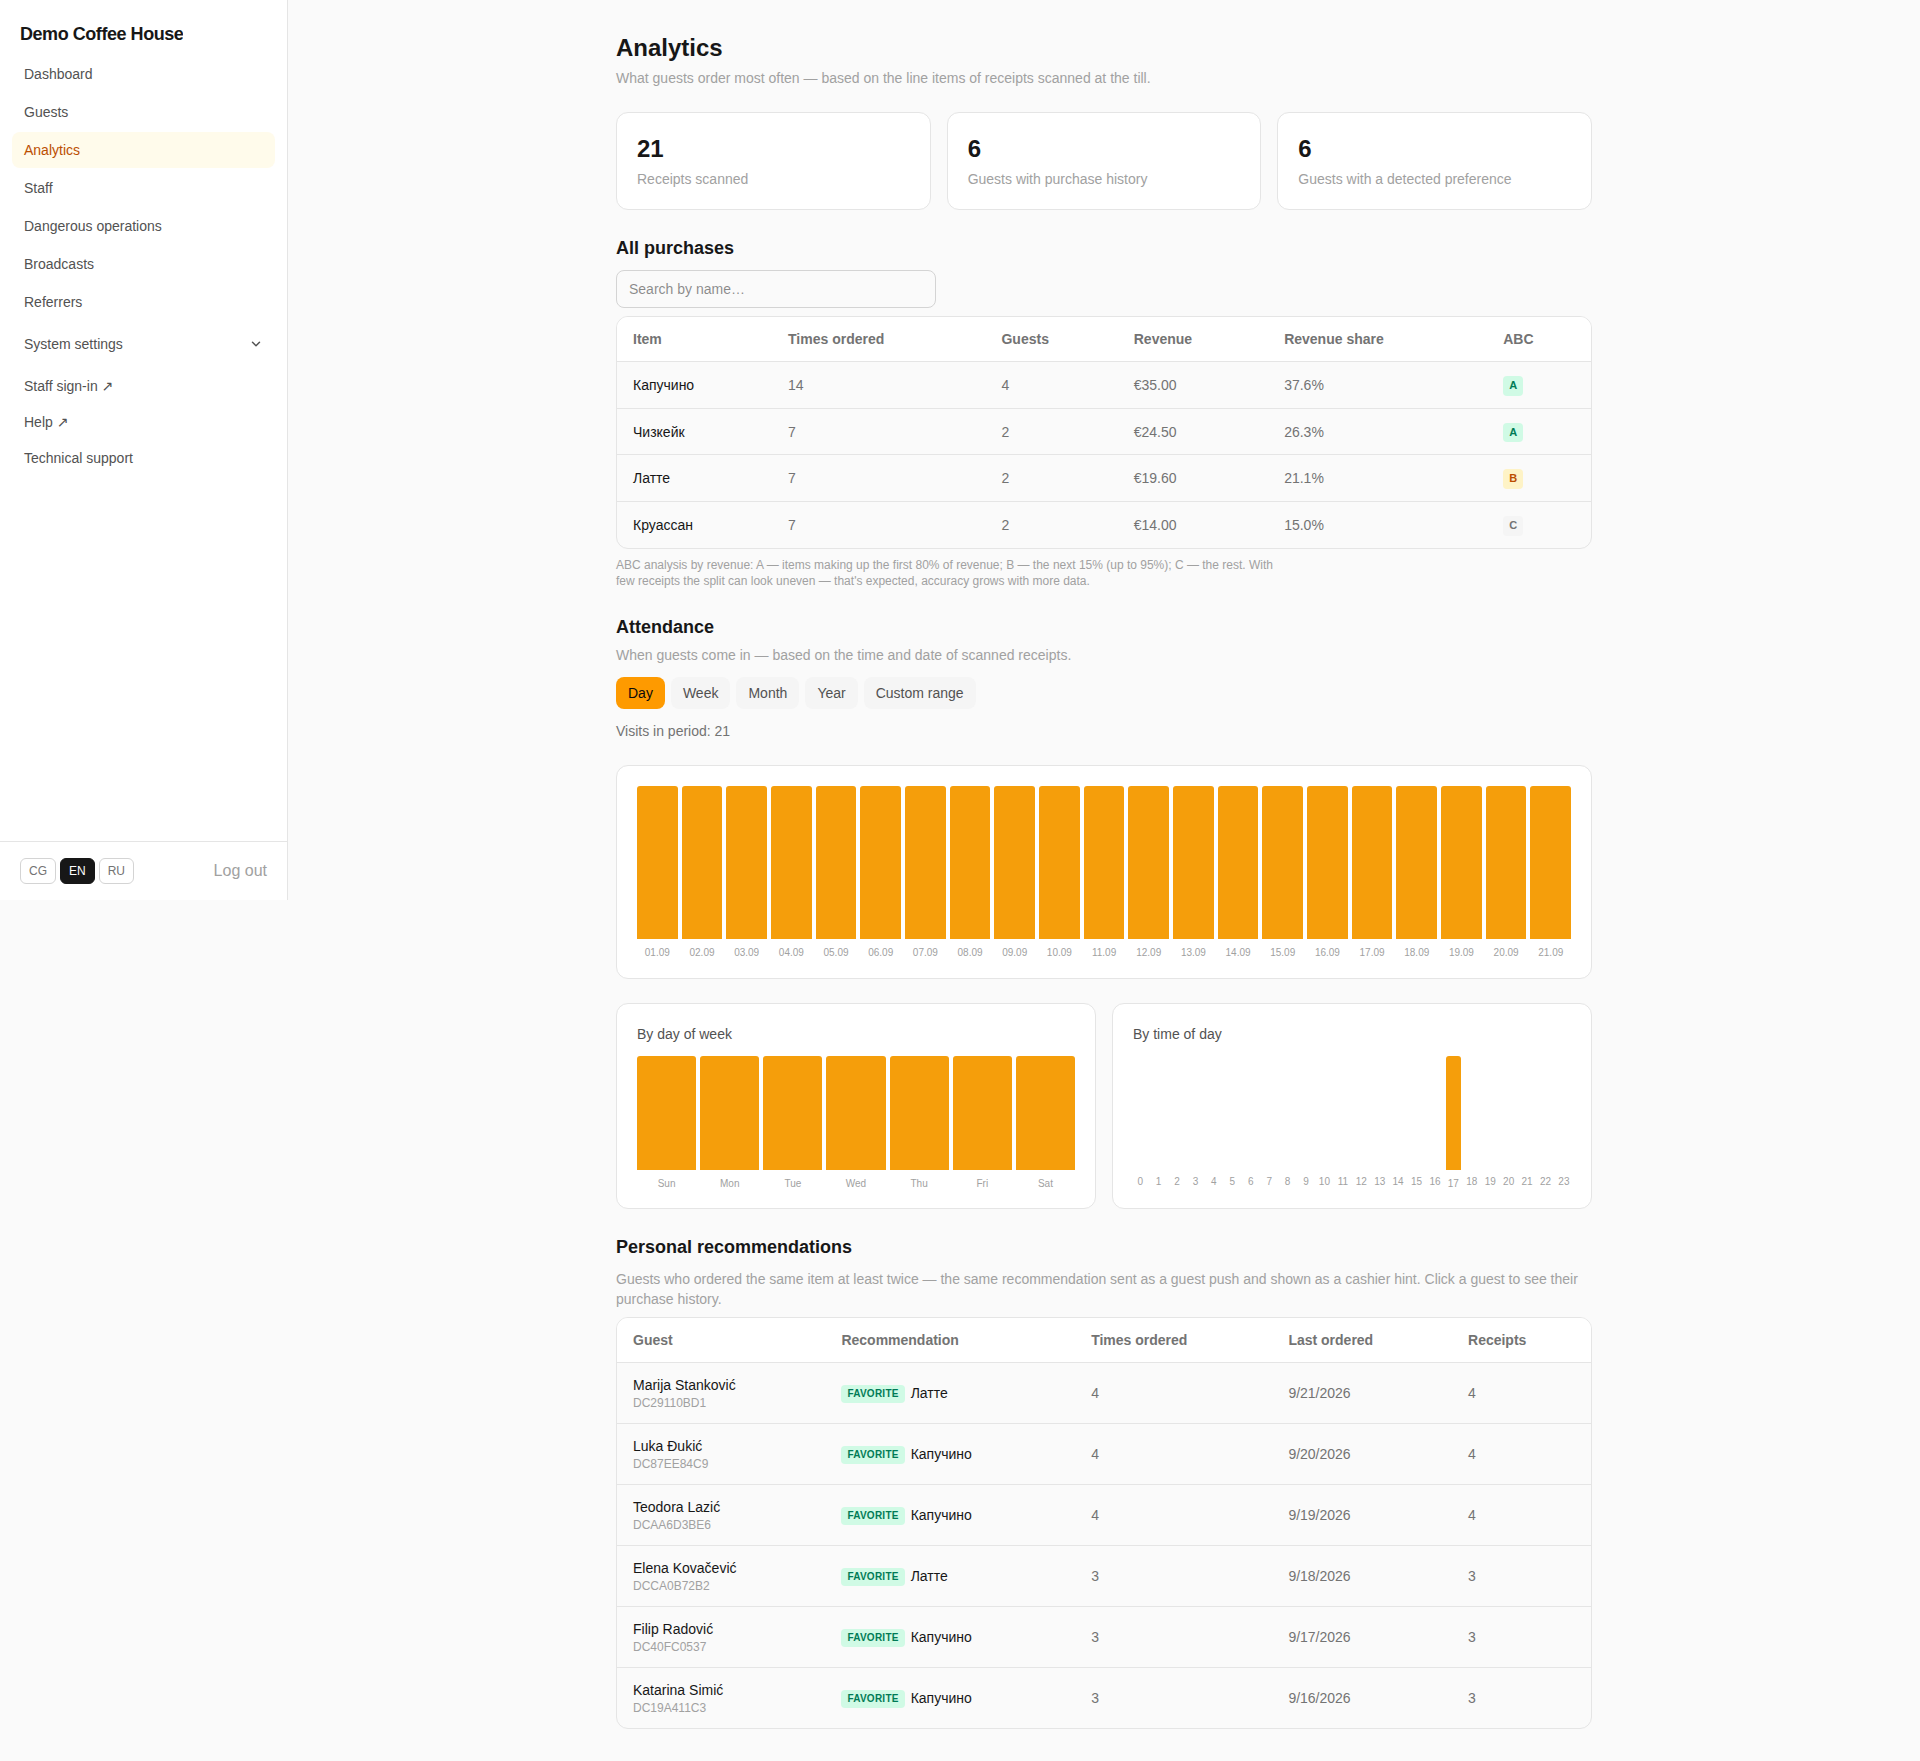
At the top, three stat tiles give the headline numbers: total receipts scanned, guests with any purchase history, and guests with an identified preference (someone the recommendation engine can confidently say usually orders a particular dish).
The All purchases table is a classic ABC analysis: for every dish, how many times it's been ordered, what percentage of total revenue it represents, and an A / B / C tier badge — A for the biggest revenue contributors, C for dishes rarely ordered. It's the fastest way to see which menu items are actually worth featuring, discounting, or dropping.
The Visits block has a Day / Week / Month / Year / Custom time-range toggle driving a chart, plus a day-of-week histogram and an hour-of-day histogram underneath — useful for staffing decisions and for timing a promotion to when guests are actually walking in.
The Personal recommendations table lists every guest with purchase history: their current recommendation — FAVORITE (ordered a dish two or more times) or MISS YOU (used to order regularly but hasn't visited in a while) — along with times ordered, last-ordered date, and receipt count. This is exactly the recommendation that surfaces as the till's proactive yellow hint (see The cashier module).
21 Item pairings
Short upsell rules that feed the till's recommendation hint.
Like Analytics, Item pairings depends on receipt-scanning data and is a Pro+ feature, unavailable on BASIC.
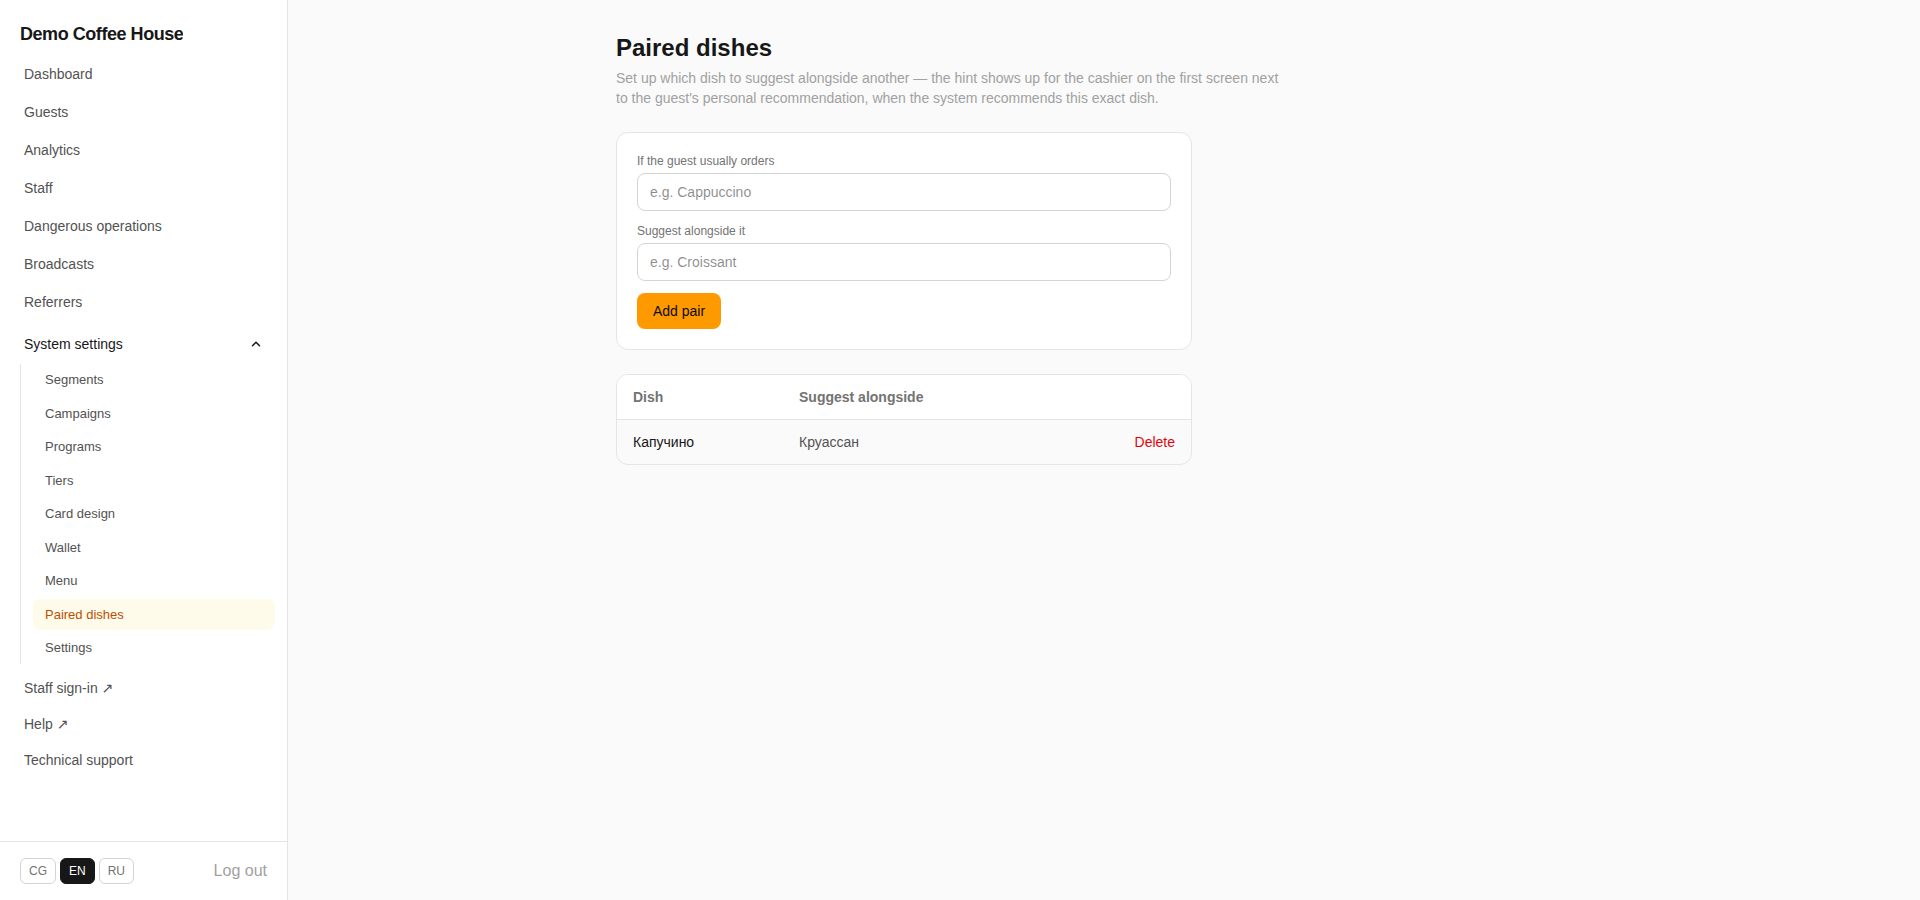
The Item pairings page holds a short list of upsell rules: a two-field form — If the guest usually orders and Suggest alongside it — plus an Add pair button. The table below lists existing pairs with a Delete action.
When a guest's favorite dish (from Analytics) has a configured pairing, the till's recommendation hint grows an extra clause: "Suggest to the guest: <paired dish>" — a natural upsell prompt shown right on the charge screen, before the cashier has even asked what the guest is having.
22 Referrers
Personal referral links for bloggers, influencers, and partners.
Referrers follow the same plan gating as push notifications — unavailable on BASIC (see Plans & licensing).
The Referrers page lets you give bloggers, influencers, or partners their own personal referral link and QR code. Tap Add referrer to create one with a name — e.g. "Instagram — @podgorica.food" or "Hotel Podgorica (partner)" — and the platform generates a unique link in the form /join/{slug}?ref=.... A guest who registers through that link is attributed to that referrer automatically, with no manual step for either the guest or your staff.
The table lists Name, Link (with Copy and QR code actions), Guests (how many signed up through that link), Revenue (their total lifetime spend), Average check, and Status (Active/disabled). A summary line at the top reads Total guests referred: N across every referrer combined.
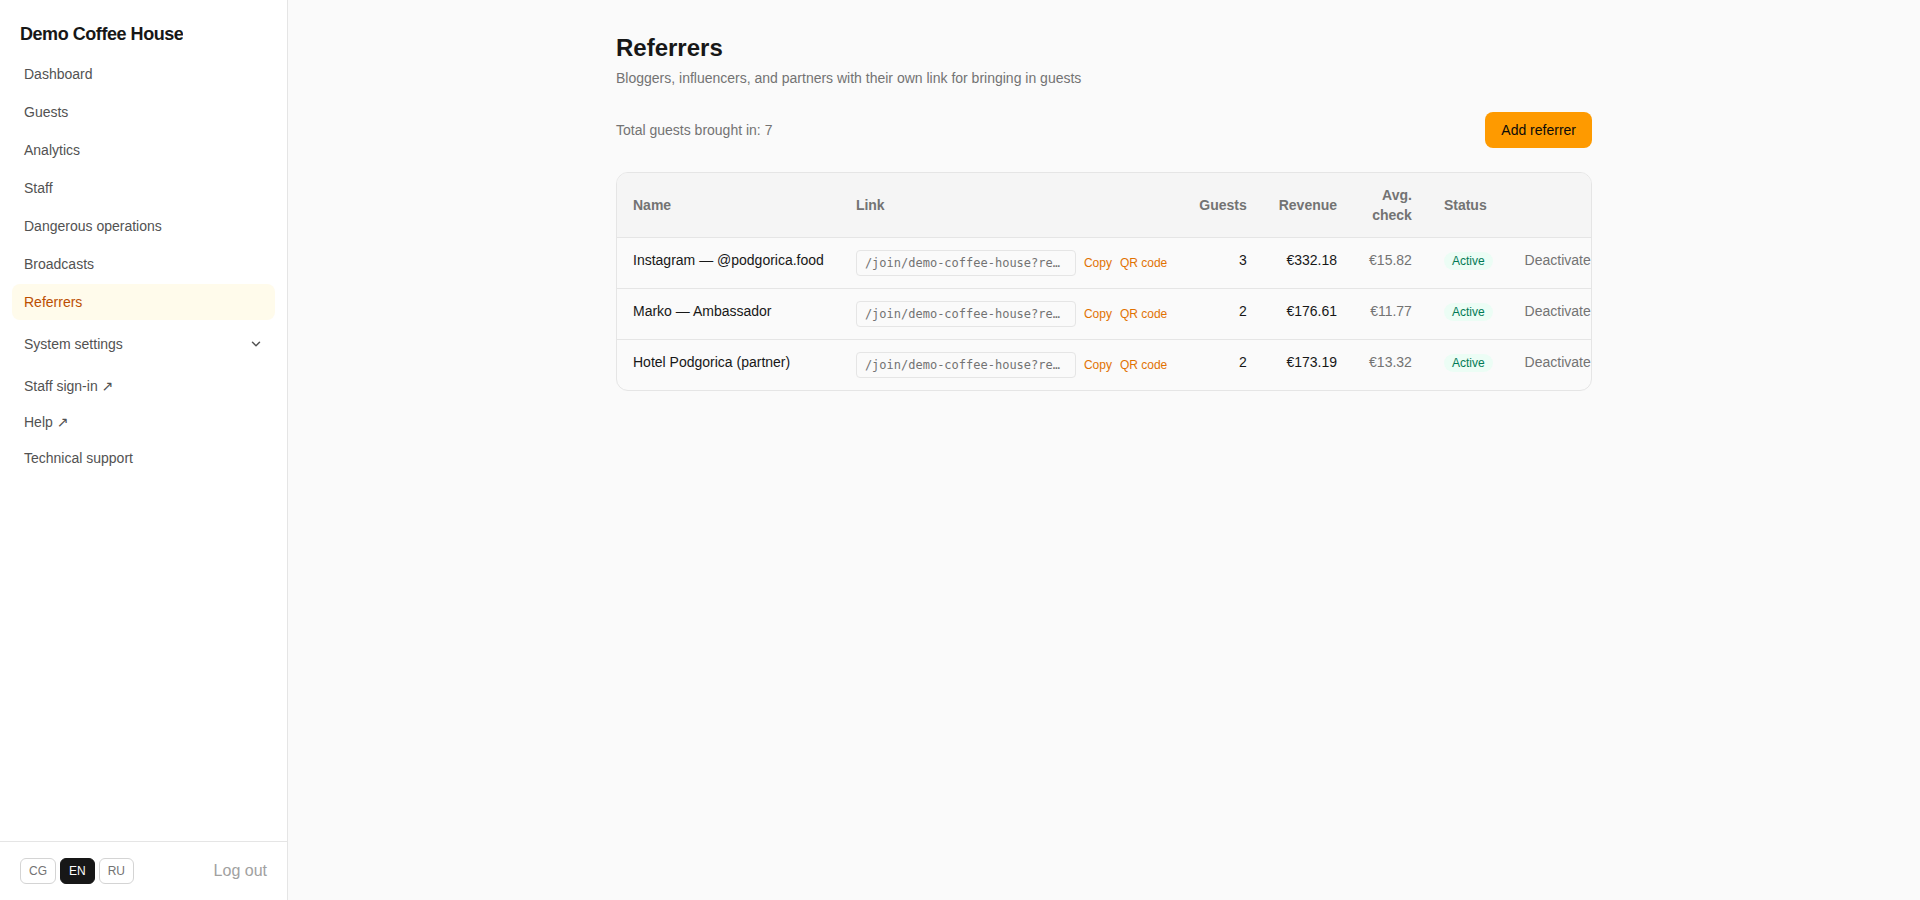
The exact same per-referrer numbers are mirrored in the Dashboard's Top referrers widget (see Dashboard) — no need to visit this page just to check who's driving guests this week.
23 Dangerous operations
Flagged transactions, pending devices, and manager-approval events — one place to review them all.
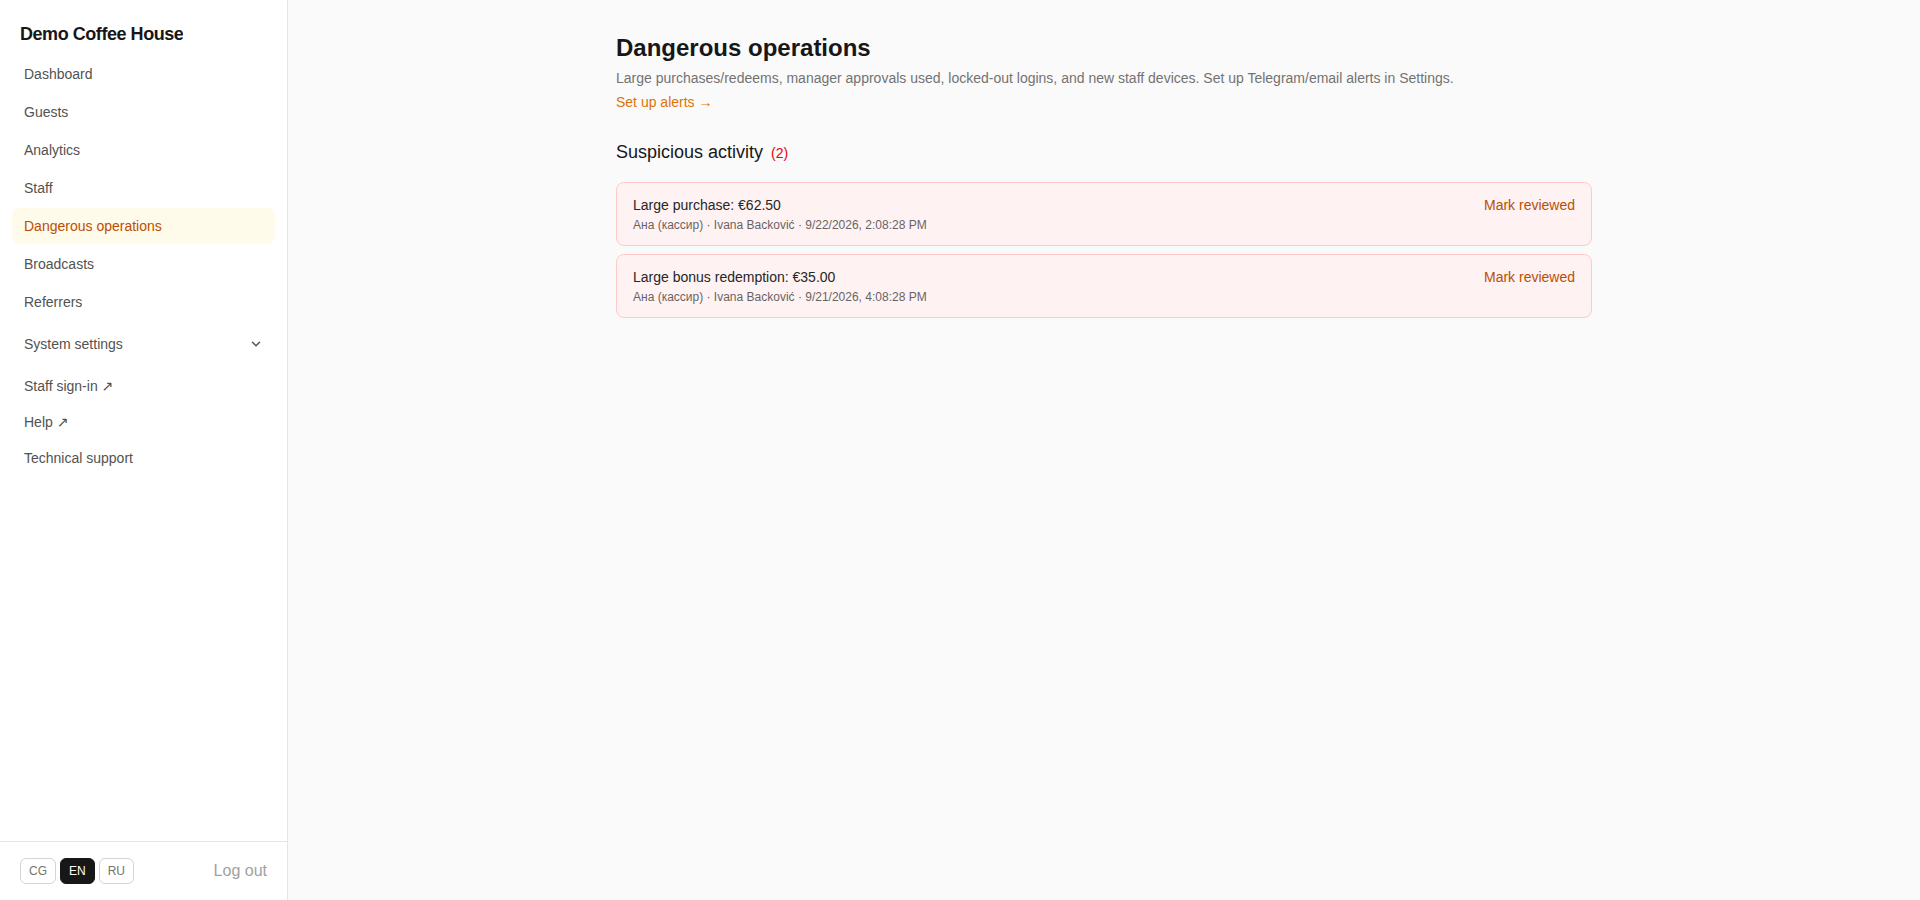
This page used to be folded into the bottom of Staff as a "Suspicious activity" list; it's since become its own standalone page in the main navigation, covering the same ground: operations that crossed the alert threshold, € set in Settings (an unusually large purchase or redemption), new staff devices waiting on approval, and events where a manager's approval was actually used. Each row shows who was involved, the amount, the guest, and the date, with a Mark reviewed action to clear it once you've looked.
A Set up alerts → link at the top jumps straight to the Dangerous-operation alerts block in Settings, so you can turn on Telegram and/or email notifications for these events instead of remembering to check this page manually.
24 Syrve integration
For venues whose loyalty is already configured in Syrve: phone card, sign-up, push and analytics with no plugin at the till
In Syrve mode, Syrve runs the loyalty: rules (cashback, discounts, gifts, coupons), earning and spending happen at the Syrve till as usual. The platform adds what Syrve lacks: the guest's card on their phone and in Google Wallet, QR/link sign-up, push notifications about earnings, referrers, campaigns and analytics. Nothing is installed at the till: the connection uses the Syrve Loyalty API.
How to connect (Syrve integration, under System settings)
- Key. Paste the Syrve Loyalty API key (issued by Syrve or your partner) and press "Connect and check". The key is stored encrypted and never sent back to the browser.
- Organization. If the key covers several Syrve organizations, choose the one this venue belongs to.
- Wallets. Tick which Syrve wallets the guest sees and name them ("Cashback", "Points"). Syrve does not report units, so you set the label and symbol (e.g. "€"). One wallet is primary and shown large. The phone look-up shows a real customer's cards and wallets, which helps to work out what each wallet means.
- Card number and code. Numbers are numeric (12 digits) with your prefix (77 by default) so they never clash with physical cards. The code on the card is a QR (read by 2D scanners and the Syrve Waiter camera) or a Code128 barcode (read by any scanner).
- Switch on. Tick the box and press "Switch on Syrve mode". From then on new guests get a numeric card and are created in Syrve (or matched by phone) automatically. Our programs, tiers, earning in the cashier app and receipt scanning are switched off.
- Guests. Guests registered earlier link themselves when they open their card. "Link all guests" does it right away.
- Webhook. "Connect webhook" gives Syrve the platform's address: when a check is closed at the till the guest instantly gets a push about the earning. Without it the platform checks guests itself every few minutes, and the balance refreshes when the card is opened.
Welcome bonus. If Syrve gives a bonus "for registration", everyone who signs up through our link gets it, including with someone else's or a made-up number: there is no SMS confirmation. If that is a risk, set the Syrve bonus to "for the first purchase".
How it works at the till
The guest shows the QR or barcode from their card (or gives their phone number). The cashier identifies them the Syrve way (scanner, card number or phone) and Syrve applies discounts and spends points itself. After the check is closed the guest sees the new balance and history on the card; the check feeds our analytics (visits, spend, referrers, segments).
What does not work in Syrve mode
Apple Wallet (on iPhone guests use the home-screen app; Google Wallet is available on Android), dish-level analytics (Syrve does not provide check contents), and our own programs, tiers and birthday bonuses, which Syrve itself runs.